Author by : Doublehorn
DAFTAR ISI
Protected by Copyscape Online Infringement Detector
aboutus website design services

Willkommen auf mein web blog

Best regard. I will do my best to make it interesting and useful. Greeting to toko online Prestashop!
Tampilkan postingan dengan label Tips-of-software. Tampilkan semua postingan

19 April 2014

Dr.Web LiveCD : Antivirus and Scanner – website files


Dr.Web LiveCD - Emergency System Recovery Disk

Dr.Web LiveCD akan membersihkan dari file terinfeksi atau mencurigakan. Dr.Web LiveCD  membantu menyalin informasi penting ke perangkat penyimpanan data yang dapat dipindahkan ke computer lain, dan lalu berusaha menyembuhkan objek terinfeksi. Serangan virus dan semacamnya merupakan bahaya laten - bisa terjadi kapan saja. Meskipun Computer tidak terhubung dengan jaringan LAN atau internet, sumber serangan  bisa datang dari media simpan atau hardware. Singkatnya. Infiltrasi virus memerlukan media (e.g Flashdisk, LAN, Internet, CD, Bluetooth, HD External atau media lain yang memungkinkan pemindahan data).

Emergency System Recovery Disk - website files

Virus adalah sekumpulan coding jahat atau program jahat yang sengaja dibuat oleh seseorang dan biasanya mempunyai tujuan tertentu.

Dr.Web LiveCD menjadi , dirancang untuk melindungi dan pemulihan sistem setelah “lumpuh” akibat serangan virus atau malware activity. Teknologi  Dr.Web memberikan perlindungan anti-virus solid untuk computer rumah (PC), jaringan kantor, dan jaringan perusahaan besar. Solusi Dr.Web dibedakan untuk kebutuhan sistem rendah, kekompakan, operasi kecepatan dan kehandalan mendeteksi semua jenis malware.

How does Dr.Web LiveCD work? - website archives

  1. Download the Dr.Web LiveCD image.
  2. Burn the image onto a CD/DVD. Users of Nero Burning ROM should proceed as follows:
    • Insert a blank CD/DVD into your CD/DVD recorder
    • Click on the “File” menu and select “Open”
    • Browse through folders to the image location and select it
    • Press the “Burn” button, and wait while the image is being written to the disk
  3. Make sure that the CD/DVD drive or any other device with Dr.Web LiveCD is set as the first-boot device. Adjust corresponding BIOS settings, if necessary.
  4. As loading starts, a dialogue will prompt you to choose between the standard and safe modes.
  5. Use arrow keys to select a desired mode and press [Enter]:
    • If you want to use the scanner with the GUI, choose DrWeb-LiveCD (Default)
    • If you’d like to start the scanner using the command line (console), select DrWeb-LiveCD (Safe Mode)
    • Choose Start Local HDD, if you want to boot from the hard drive instead of Dr.Web LiveCD
    • Select Testing Memory to launch the Memtest86+ utility
  6. If DrWeb-LiveCD (Default) is selected, the operating system will detect all available disk drives automatically. It will also try to connect to the local network, if available.
  7. When the system is loaded, check the disks or folders you want to scan, and click on “Start”.
  8. If you need extra help, you can contact the Doctor Web DrWeb-livecd_ico1 Support Team by filling out a Support-Request Form on our web site or sending your request via e-mail DrWeb-livecd_ico2
  9. The Midnight Commander file manager is used to work with files you need to copy to a safe location DrWeb-livecd_ico3
  10. If the operating system failed to configure access to your network, you can do it manually using Networks Configure Manager. From the “Start” menu, go to “Settings,” and then to “Networks Configure Manager”.

How it works (liveUSB)? - website design files

Create an emergency repair USB drive
  • Connect a USB flash drive to the Computer. Registering the plugging in event takes no more than 10 seconds.
  • Launch drwebliveusb.exe.
  • The program will detect available USB-devices automatically and prompt you to choose the one you’d like to use as an emergency repair drive. You can format the device if you like (a warning will be displayed before you proceed with formatting). In order to read the License agreement, follow a corresponding link found in the program window (the page containing the license agreement text will be loaded in your default browser).
  • To create a bootable USB flash drive, press the Create Dr.Web LiveUSB button.
  • Files will be copied automatically.
  • Once the copying process is completed, press the Exit button to close the application.
Developer : Doctor Web Ltd

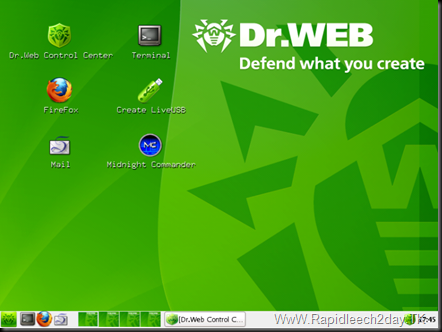
Screenshot 1. Graphical User Interface
website Doctor Web Ltd 
Screenshot 2. Dr.Web Control Center for Linux

Dr.Web Control Center for Linux OS Requirements: All
License : Freeware

Download Dr. Web LiveCD & LiveUSB 6.0.0 – arsip website

LiveCD | 175MB
Download Dr.Web LiveCD From Jumbofiles   or
Download Dr.Web LiveCD From Uploaded
LiveUSB | 177MB
Download Dr.Web LiveUSB From Jumbofiles   or
Download Dr.Web LiveUSB From Uploaded


That's all we know - Happy blog blogger

read more website design

20 Agustus 2013

Website Prestashop di localhost : Membuat database


Website  harus punya web server sebagai tempat web hosting dan perlu nama domain. Nama domain sama seperti nama toko. Web hosting dianalogikan bangunan toko. Domain dan web hosting untuk toko online bisa berbayar (tahunan / bulanan), atau gratis seperti toko online template Bloggerstore, contoh http://yogya-batik.blogspot.com dan http://loving-craft.blogspot.com.

Website toko online Prestashop di Localhost

Membuat rancangan design toko online Prestashop tanpa terhubung internet tampaknya sangat menarik. Anda dapat mendesainnya di localhost (intranet) computer. Tetapi terlebih dahulu Anda harus install software aplikasi XAMPP (versi terbaru 1.8.1). Kemudian harus membuat database mySQL di PHPMyAdmin dengan software tersebut.

Penjelasan singkat,  untuk proses installasi Prestashop dalam xampp / localhost / server local / secara offline, disyaratkan Anda harus memiliki 2 aplikasi berikut ini :
  1. Xampp :
    Untuk mendapatkan versi terbaru Download di sini. Lalu diinstal di computer.
  2. CMS Prestashop :
    file Download disini. Di-extract dan copy paste ke C:\xampp\htdocs\.

Membuat database website dengan XAMPP

Membuat database mutlak dibutuhkan sebelum mengintall Prestashop atau template website apapun Cara membuat database mySQL di PHPMyAdmin pada aplikasi XAMPP seperti di bawah ini.
  1. Jalankan software aplikasi XAMPP sehingga muncul tampilan XAMPP ini :

    Membuat database Prestashop dengan Xampp

  2. Ketik “localhost” atau “http://localhost” pada adress bar browser Anda.
  3. Pilih sub menu PHPMyAdmin yang ada di menu Tools pada kolom kiri bagian bawah. Atau langsung saja buka http://localhost/phpmyadmin/
    (skip langkah 2 - 3).

    Xampp_membuat database MySQL

  4. Buatlah nama database. Saya coba membuat dengan nama "prestashop100".
  5. Klik tombol Create. Untuk Table Name. Dan Number of fields dikosongkan saja karena nanti akan terisi otomatis ketika proses instalasi Prestashop.

  6. Selanjutnya lakukan Instalasi Prestashop dan ikuti tutorial detail ada di LINK ini :


    Catatan tambahan : membuat website store Prestashop di Localhost

    Jika ingin membuat database lain selain database untuk Prestashop lakukan 6 langkah lanjutan berikut ini :

  7. Beri nama Database dan Tabel - tentukan jumlah fields, e.g 5 (sesuai kebutuhan)
  8. Masukkan kategori-kategori database yang akan dibuat (id, nama, alamat, etc)
  9. Isikan, jenis data (e.g integer, varchar, date atau lainnya). Tentukan juga kategori mana yang akan dijadikan primary key.
  10. Masukkan data sesuai kategori.
  11. Klik Go dan data tersebut akan tersimpan. Jika ingin melihat hasilnya, klik Browse.
  12. Database telah selesai dibuat, close browser. Kemudian stop XAMPP.

That's all we know - Selamat Mencoba, sukses selalu! - Happy blog blogger


read more website design

01 Februari 2013

Windows Installer CleanUp Utility : solusi gagal install


Gagal menginstal website editor Windows Live Writer

S aya punya pengalaman buruk dengan post editor yang biasa saya gunakan - yaitu Windows Live Writer, ketika tiba-tiba tidak bisa digunakan lagi dan harus install ulang. Masalah berlanjut, saya kesulitan uninstal di Control Panel Windows. Saya mencoba beberapa cara alternatif menggunakan TuneUp Utility (TUN), Ccleaner maupun Advanced SystemCare dan GAGAL semua.  Terpaksa saya lakukan secara manual dengan menghapus folder pada Programme Files di Directory C: menggunakan TuneUp Shredder salah satu fitur dari TUN.

Masalah lebih besar baru dimulai ketika saya gagal meng-intall Windows Live Writer. Sebagai informasi, computer saya menggunakan system Operation Windows XP2 pack 3.

Saya mencoba berbagai cara untuk reinstall dan selalu gagal. Kegagalan terjadi setelah saya menekan tombol RUN seperti pada gambar dibawah ini :

security warning install software

Memang setelah menekan tombol RUN terjadi proses instalasi Windows Live Writer, tetapi beberapa detik kemudian indikator instalasinya hilang.

Ini fatal bagi saya yang setia setiap harinya update blog-blog dengan Windows Live Writer sejak 2 tahun terakhir. Memang bagi user platform blogger atau wordPress bisa melakukan update post melalui halaman Editor. Sayangnya saya agak "gagap" karena fiturnya saya merasa kurang nyaman dibanding dengan milik Windows Live writer.

Windows Installer CleanUp Utility - arsip website

Akhirnya saya temukan solusi atas kegagalan install software setelah browsing di Google. Saya harus pakai Windows Installer CleanUp Utility untuk menghapus informasi instalasi program.

"This is my choice. There are many like him but this one is mine."

Video Tutorial Microsoft Windows Installer CleanUp Utility dari situs MajorGeeks bisa dilihat di Yotube pada alamat URL berikut : (atau klik gambar dibawah ini)

http://www.youtube.com/embed/rox1Qp5zqEc?hl=en&fs=1

tutorial-windows-installer-cleanup-utility

Windows Installer CleanUp Utility might be able to help

When you are working on your computer and installing a new program, the installation suddenly fails. Now you are left with a partly installed program. You try to install the program again, but you are unsuccessful. Or, maybe you have problems trying to remove an old program because the installation files are corrupted.

You can use the utility to remove installation information for programs that were installed by using Windows Installer. Be aware that Windows Installer CleanUp Utility will not remove the actual program from your computer. However, it will remove the installation files so that you can start the installation, upgrade, or uninstall over.

Download Windows Installer CleanUp Utility via website MajorGeeks

Untuk Download silahkan kunjungi situs ini :  http://majorgeeks.com/download.php?det=4459

Setelah install dan RUN akan muncul semua file instalasi, pilih file instalasi yang akan dihapus lalu klik REMOVE.

EDITOR'S NOTE :

The Windows Installer CleanUp Utility is provided "as is" to help resolve installation problems for programs that use Microsoft Windows Installer. If you use this utility, you may have to reinstall other programs. Caution is advised. We recommend that you do not use this utility with 2007 Office system products.

Contoh penggunaan ada pada artikel ini :

I was using Windows Live Writer for sometime on XP SP2. After installing SP3, many programs stop working. One of them is the Windows Live Writer. I keep getting Windows Installer error and Windows Live Setup service errors in the event log.

It seems that when running Windows XP SP3 many people are having issues installing windows live applications using the windows live installer. After much googling I have come across a solution. This also solves issues that exist with the windows update service after installing SP3.

Essentially what you need to do is :
  1. Download and run the Windows Live Installer Cleanup tool from :


  2. Reboot
  3. Click START >> Run and type 'command' to load the console.
  4. Type in :     regsvr32 wups2.dll   Then press enter.
  5. Type exit to leave the console
  6. Download and run the windows live installer, it should now work perfectly.


That's all we know - Happy blog blogger

read more website design

25 Januari 2013

Solusi Fake SN Internet Download Manager| website file

IDM has been registered with a fake SN | website archive

S aya akan sharing di blog blogger saya trik mengatasi Internet Download Manager yang memunculkan pesan error :

Fake Serial Number

Pertama saya mengalami pada tanggal 26 –12–2011. Saat itu muncul tawaran Update IDM. Biasanya ini saya abaikan (klik NO). (Terus terang saja!! Software andalan ini saya dapatkan secara gratis dari internet). Tetapi entah mengapa? Kali ini saya tergoda tawaran tersebut dengan menekan tombol OK. Setelah download file kelengkapan untuk Update IDM, seharusnya diikuti proses reinstall, tetapi ternyata muncul Notasi Peringatan ini

fake serial number internet download manager

Ketika di klik OK, saya harus mengisi Prompted form. OK. jangan diisi dulu form tersebut.

Tips kali ini akan memberi tutorial mengatasi Serial Number IDM kena blok (Fake serial number). Caranya mudah dan berbeda dengan cara sebelumnya dalam mengatasi hal yang sama.

Dulu yang saya lakukan adalah melakukan unistall IDM, kemudian reinstall IDM dan memasukkan Serial Number. Butuh banyak waktu dan kemungkinan GAGAL karena Serial Number yang dimaksud sudah tidak bisa dipakai lagi atau ada file yang terkait dengan IDM lama yang belum dihapus karena belum menghapus Cache atau semacamnya.

Mengatasi IDM kena blokir - website files

Lakukan langkah-langkah mudah dibawah ini :

  1. Buka C:\WINDOWS\system32\drivers\etc , Terlihat file host. Silahkan klik kanan dan Open with Notepad
  2. Setelah terbuka silahkan tambahkan daftar dibawah ini,  letakkan tepat dibawah kata 127.0.0.1 local host

  3. Disimpan (klik SAVE)
  4. Klik kanan pada file host dan pilih properties, Centang Read only dan klik OK
  5. Matikan koneksi internet Anda
  6. Silahkan buka Internet Download Manager
  7. Jika masih muncul form box seperti diatas, isikan saja data (boleh diisi sembarangan untuk first name, last name dan email address, yang penting Anda jangan lupa Serial Number).

Jika lupa Serial Number, gunakan saja serial number pada list ini (pilih salah satu) :
  • EC0Q6-QN7UH-5S3JB-YZMEK
    GZLJY-X50S3-0S20D-NFRF9
Setelah semua data diisi, akan hilang dengan sendirinya. IDM pun bisa digunakan kembali.


That's all we know - Happy blog blogger

read more website design

11 Desember 2012

IDM : Solusi Download Terputus di Mediafire | website files


Apakah Anda maniak pemburu free material download, maka tidak salah memilih software downloader Internet Download Manager (IDM) yang handal. Untuk memastikan kehandalannya silahkan memilih downloader berbayar seperti Internet Download Manager terbaru atau yang selalu di-update.

Namun jika Anda tetap menginginkan yang gratis – itu juga bisa. Banyak situs yang memberi layanan file sharing. baik berbayar dan harus login ataupun FREE untuk mendapatkan Serial Number IDM terbaru. Hanya saja Anda perlu sabar, cermat dan ulet mencari di Google karena bagi pemburu download gratisan (sebelum benar-benar dilarang), tentu tidak semuanya berjalan lancar.

Berburu Downloader handal : Pilih IDM - arsip website

Namanya juga gratisan, kadang kita mengalami masalah tidak terduga, seperti download lambat, download terputus-putus meskipun masih bisa di-RESUME. Atau bahkan sama sekali tidak dapat di-RESUME. Bila file size kecil (kurang dari 10 MB)  boleh jadi “No-Problem” – hanya perlu download ulang. Tetapi akan fatal jika ukuran file ratusan MB atau diatas 1GB. Alamak! Capek deh!!! Jika harus mengulang terus, apalagi jika speed software downloader sangat lambat.
gagal resume Internet Download Manager

Diantara banyak situs file sharing seperti Rapidshare, Megaupload dan masih banyak lagi, pilihan favorit saya adalah download via Mediafire. Tapi saat download di Mediafire pernahkah Anda mengalami problem terputus (tidak bisa di resume)??? Jika pernah, Anda perlu mencoba tips berikut ini.

Tetapi sebelumnya Anda perlu mengetahui mengapa bisa gagal resume?
Penyebabnya adalah  IP Address mengalami perubahan sehingga tidak bisa melakukan resume download.

Bagaimana Solusinya? - website archives

Ini ada tips sederhana (Tips ini baru saya coba menggunakan IDM – Internet Download Manager 19)


Tips Resume Di Mediafire :
1.   Buka IDM. Pada tabel File Download, klik kanan ----> properties file yang tidak bisa di resume dan
      hendak kita resume.
2.   Perhatikan pada kolom Address, URL Download sudah tidak direct lagi.
3.   Selanjutnya, masukan URL File Download yang akan di resume pada Address Bar Browser.
4.   Klik kanan "Click here to start download from MediaFire.." klik copy link location.
      Jangan langsung klik download!!
5.   Kemudian paste di kotak address
6.   Sekarang anda bisa resume download kembali.


CATATAN :
Jika Anda masih mengalami kegagalan, Coba bersihkan sisa cache browsing menggunakan CCleaner atau tool Advanced System Care (ASC), Kemudian lakukan Restart modem atau Restart computer. Ulangi langkah-langkah di atas. 

SELESAI


read more website design

22 Agustus 2012

Tip Solusi Download Terputus (tak bisa Resume) IDM


Website Design tips : Download terputus pada IDM

Ada banyak website yang memberi layanan file sharing di dunia internet. baik berbayar dan harus login ataupun FREE. Tapi bagi pemburu download gratisan (sebelum benar-benar dilarang), tentu tidak semua proses berjalan lancar, Masalahnya mulai dari download lambat, download terputus-putus tetapi masih bisa di-RESUME. Atau sama sekali tidak dapat di-RESUME.

Bila download file ukuran kecil dibawah 10 MB  boleh jadi No-Problem - tinggal diulang. Tetapi akan fatal jika ukuran file puluhan hingga ratusan MB. Kalau harus mengulang terus,  apalagi jika proses download sangat lambat. Alamak! Capek deh!!!

Diantara banyak situs file sharing seperti Rapidshare, Megaupload dan masih banyak lagi, saya lebih suka download via Mediafire karena merupakan  situs file sharing favorite diantara banyak situs file sharing  lain.

Tapi saat download di Mediafire pernahkah Anda mengalami problem terputus (tidak bisa di resume)??? Jika pernah, Anda perlu mencoba tips berikut ini. Tetapi sebelumnya Anda perlu mengetahui mengapa bisa gagal resume? Hal itu disebabkan IP Address Anda mengalami perubahan sehingga tidak bisa melakukan resume download,

Bagaimana solusi di website ini?

Kita bisa mengakali dengan tips sederhana berikut ini (Tips ini baru saya coba menggunakan IDM – Internet Download Manager 19).

Tips Resume Di Mediafire :
1.   Buka IDM. Pada tabel File Download, klik kanan ----> properties file yang tidak bisa di resume dan
      hendak kita resume.
2.   Perhatikan pada kolom Address, URL Download sudah tidak direct lagi.
3.   Selanjutnya, masukan URL File Download yang akan di resume pada Address Bar Browser.
4.   Klik kanan "Click here to start download from MediaFire.." klik copy link location.
      Jangan langsung klik download!!
5.   Kemudian paste di kotak address
6.   Sekarang anda bisa resume download kembali.
solusi internet download manager

CATATAN :
Jika Anda masih mengalami kegagalan, Coba Anda bersihkan sisa-sisa cache atau cookies browsing Anda dengan menggunakan CCleaner atau tool Advanced System Care (ASC) atau Tuneup Utilities, Kemudian lakukan Restart modem atau Restart computer.  Ulangi langkah-langkah di atas. Trik di atas, insyaAllah bisa bekerja.


That's all we know - Happy blog blogger - semoga bermanfaat

read more website design

29 April 2012

Free IDM 6.07 Final Build 12 Full Version - website files


Jika hobby Anda download apa saja di internet maka aplikasi Internet Download Manager bisa menjadi pilihan favorit. Tapi jika IDM Anda tidak ASLI pasti repot jika harus mencari crack, keygen atau SN-nya. Saya ingin share IDM versi 6.07 Final Build 12 Full Version lengkap dengan SN.

Internet download manager favorite

IDM 6.07 Final Build 12 Full Version - website archives

Langsung saja menuju link ini :

- IDM 6.07 Final Build 12 Setup : Download

Prosedur Download IDM versi 6.07 :

  1. Disconnect dari Internet (offline)
  2. Jalankan KeyPatch
  3. Pilih "Clear Previous registration data"
  4. Pilih "Patch Server Check" - Lalu pilih "IDMan.exe" yang baru saja Anda Download (nama file : idman607 – 4,36 MB)
  5. Lalu klik RUN dan ikuti proses install-nya
  6. Selesai install, muncul halaman Utama IDM, pada menu Task Bar pilih Registration.

    Jika ada perintah registrasi online pilih NO

  7. Pada Menu REGISTRATION – klik “Registration”
  8. Isikan Datanya :

        First Name   : ………  (terserah isian Anda)
        Last Name  :  ………  (terserah isian Anda)
        Email           :  Terserah Anda 
        Serial     : COPY & PASTE saja SN dari KeyPatch yang terbentuk di bagian bawahnya.
        Selesai 
----   Lakukan hal yang sama bila terjadi Fake Serial Number karena ter-Update.

CATATAN :
Sebelum install Patch IDM 6.07 Final, Anda disable dahulu antivirus yang Running.

Solusi Serial Number kena blok (Fake SN) pada IDM - arsip website

Saya juga ingin sharing tip mengatasi SN Internet Download Manager kena blok atau Fake Serial Number. Pernahkah Anda mengalaminya?  Saya pernah mengalami dan bisa diatasi dengan tips ini.

Bagaimana agar IDM kena blok atau fake SN bisa aktif lagi?

  1. Buka C:\WINDOWS\system32\drivers\etc , Pilih file host lalu Open with Notepad.
  2. Setelah terbuka, tambahkan daftar ini. Letakkan tepat dibawah kata 127.0.0.1 local host.

  3. Disimpan atau klik SAVE
  4. Klik kanan file host. Pilih properties, beri tanda check pada Read only dan klik OK
  5. Jika sudah selesai, silahkan buka IDM Anda.
  6. Jika masih muncul, isi saja datanya (boleh isi sembarangan) kecuali Serial Numbernya.


Untuk SN, pilih salah satu dari list ini :

3J5U-8U66N-D0B9M-54SLM
EC0Q6-QN7UH-5S3JB-YZMEK
GZLJY-X50S3-0S20D-NFRF9

Setelah semua data diisi maka akan hilang sendiri dan IDM sudah bisa digunakan kembali.


read more website design

23 Januari 2012

Craagle : Tools Pencari Licence Key / Serial Number


Dengan berbagai alasan banyak orang mencari software gratis di internet. Tetapi sering yang ditemukan Free Trial untuk jangka waktu 15 hari atau 30 hari atau lainnya. Untuk mendapat layanan selanjutnya atau dapat menggunakan fitur lebih banyak (PRO) sering dibutuhkan Licence Key atau Serial Number.

Berburu website penyedia serial number software trial

Jika kita ingin mencari Serial number,suatu Software atau program biasanya kita mengetikkan keyword yang terkait dengan software tersebut ke search engine  Google ataupun Yahoo sehingga di halaman SERP (Search Engine Pages result)  akan ditampilkan hasil pencariannya beserta Link yang menyediakannya.

Ataupun dapat juga langsung mengunjungi website yang khusus menyediakan hal tersebut seperti Astalavista. Tapi adakalanya jika kita langsung mengunjungi website-website tersebut sering kali kita direpotkan oleh Spam, popup ataupun spyware yang terdapat dalam website tersebut.

Jika ingin aman dan tidak direpotkan oleh hal-hal semacam itu, kita bisa menggunakan suatu software yang bisa mencari Serial number  suatu software tanpa kita harus masuk langsung ke website yang menyediakan hal tersebut.

Nama Tools-nya "CRAAGLE" yang merupakan software ringan yang bisa digunakan untuk mencari serial number dan dari suatu software secara online dengan hanya mengetikkan nama software yang akan kita cari pada kolom search.

Gambaran umum dari software ini dapat dilihat dibawah ini :


  • Download Softwarenya disini
  • Selanjutnya hasil download, di-Ekstrak ke Computer anda dan langsung jalankan program ini (tidak perlu proses instalasi) dengan mengklik file "Craagle.exe"
  • Pastikan koneksi internet anda sudah aktif
  • *Ketikkan nama Tools atau Software atau program yang akan dicari pada kotak "Search" lengkap dengan versinya. Contoh : Winzip 9.0
  • Lalu tandai jenis pencariannya, "Serial" ataupun "Cover"
  • Klik Tombol "Search"
  • Biarkan software ini bekerja mencari yang anda inginkan.
  • Untuk serial number tinggal anda klik saja salah satu hasil pencariannya dan akan terlihat isi serial numbernya pada kotak dibawahnya.


That's all we know - Happy blog blogger


read more website design

22 Januari 2012

Reimage PC Repair Online : Perbaikan OS Windows XP


Perbaikan sistem operasi Windows XP - arsip website

Anda user Windows XP? Apakah Anda menyadari bahwa sistem Windows yang digunakan lebih lambat dibandingkan dengan ketika pertamakali menginstal. Seiring dengan waktu, performance OS Windows XP  melambat karena banyaknya instal program & file yang disimpan dan daya sistem operasi yang digunakan lebih banyak. Sementara Maintenance rutin Anda abaikan, maka kerja PC Anda pun lambat.

Selain itu juga karena banyaknya registry selama pemakaian, Spyware, Virus, Worm dan Malware dan gangguan lainnya karena penggunaan internet dan file sharing. Secara tidak sadar Anda memberi akses spyware atau malware yang semuanya akan merusak OS Windows XP. Resiko terburuknya adalah harus menginstal ulang.

Tetapi perlukah menginstal ulang Operating System Windows XP Anda? TIDAK PERLU lagi. Dengan memanfaatkan Reimage@ Repair PC Online Anda dapat melakukan diagnosa total komputer dan repair. 

Fixes Every Error, Every Crash and Every Freeze

Specializing In 100% Windows OS Repair

reimage PC repairreimage-PC-repair-start

Reimage Repair PC Online adalah layanan berbasis web yang menjalankan ActiveX melalui perbaikan sistem Windows XP yang rusak sehingga sistem operasi Anda akan running seperti pertama kali diinstal. Reimage memperbaiki OS Windows XP secara online.

Reimage bisa mencari komponen atau file yang hilang atau diubah oleh virus, malware atau software berbahaya. Kemudian, Reimage akan menggantikan komponen yang hilang dengan database repositori dan memulihkan layanan ke keadaan semula. Untuk komponen baru Reimage akan menonaktifkannya sehingga tidak membahayakan yang lain. Tidak seperti built-in Windows XP system restore, Reimage tidak mempengaruhi data pengguna atau aplikasi pada OS.

Berikut ini beberapa fitur Reimage :
  1. Mengurangi waktu perbaikan - Hemat waktu karena Reimage mudah digunakan. Tidak perlu memanggil teknisi setiap kali Ada masalah PC.
  2. Optimalkan Windows XP - Reimage menyediakan diagnosis PC, termasuk penggunaan prossesor, memori, hard-disk etc. Kemudian memberi 1 set rekomendasi untuk PC Anda.
  3. Perbaikan semua jenis masalah PC untuk OS Windows XP - Ini termasuk registry fixes, driver fixes, memeriksa masalah security, dan menonaktifkan semua jenis program virus.
  4. Tidak perlu instalasi – sebab Reimage berbasis web menggunakan ActiveX, Anda bisa menjalankan di mana saja selama Internet Explorer diinstal.

Untuk Reimage Home Edition, tersedia dengan PC booster gratis yang mampu mempercepat program yang paling umum pada PC Anda.

Sayangnya, Reimage hanya tersedia untuk Windows XP.

Download Reimage PC Repair - arsip website

Silahkan kunjungi http://reimage.com

Download versi terbaru klik ini Reimage@ Repair PC Online version 1.6.0.9


That's all we know - Happy blog blogger


read more website design

Download di Filesonic via Internet Download Manager| website file

Free Internet Download Manager - website archives

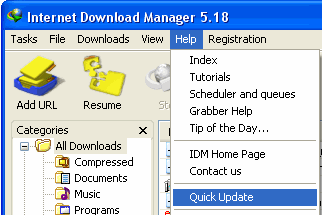
  1. Make sure you are using the latest version of IDM. Please use "Help->Quick Update" IDM main menu item to get the latest version of IDM installed or download it from our site.

  2. If you have a premium account on Filesonic site :

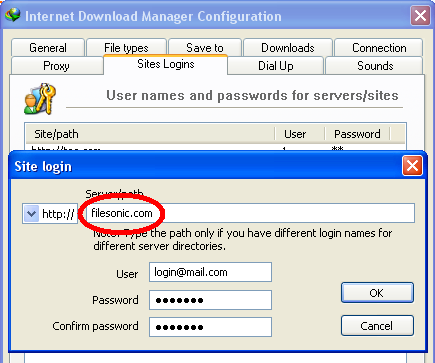
    1. You need to add login and password for this site in "Options->Sites Logins" IDM dialog

      IDM filesonic_opt
    2. Please note that in some cases downloads which have been started in old versions of IDM (earlier than 5.19), may not be able to finish. Unfortunately you will need to delete such downloads and add them again in a new version of IDM.

    3. Also maybe your premium account has expired. When IDM starts downloading HTML files, you need to try to log in to your account and check that everything is in order. Also you can try to download a file with a browser. IDM should not catch the download, and you should see a web page with the explanation of this problem.

    4. Please do not use & and # characters or other special characters in your password. If you use them, log in to Filesonic site and change your password so that it contains neither # nor & characters.

  3. If you have free account on Filesonic site :

    1. Don't try to download Filesonic files directly from other sites via browser context menu :

      IDM via filesonic
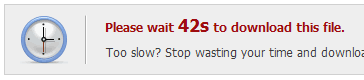
      You need to click the link to go through Filesonic site and get the real download link there. At first you need to wait the necessary time :

      filesonic1 internet download manager
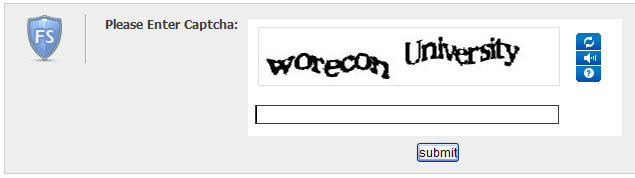
      Then enter and submit the security code :

      filesonic2 internet download manager
      And finally get the real download link :

      filesonic-start IDM
    2. It is important! Trial account settings on Filesonic do not allow requesting the same file twice. The browser made the first request of the file and then when IDM tried to request the same file again, the site sent a web page to IDM instead of the download.

      If you use IE or Mozilla Firefox, now you need to use browser's "Download with IDM" context menu item :


      To take over this download from other browsers you can set a special key in "IDM Options->General->Keys...". Note that "Ins" key should work for most browsers.

      When you will enter a security code and get the real download link, you need to press and hold this key while clicking on download link so that IDM could take over the download before the first browser request.

    3. You need to enable "Start downloading immediately while displaying 'Download file info' dialogoption in "Options->Downloads" dialog (if it is disabled). When downloaded is started, please don't pause it. Don't use "Start Download Later" button on "Start Download Info" dialog.

  4. Also if you use FireFox problems may happen if you use extensions from third party companies to transfer download in IDM, for example Flashgot. IDM can perfectly detect downloads itself but if you really want to use Flashgot, at least update it to the latest version.


    Internet Download Manager, Tonec Inc. 641 Lexington Avenue, 15th fl. New York, NY, 10022 E-mail: info@tonec[DOT]com
    source :

    www.internetdownloadmanager[DOT]com/support/filesonic_dwnl[DOT]html


read more website design

22 Desember 2011

Official Tutorial of IDM : Integration guide for Firefox


Saya kutip tuorial resmi dari TONEC Inc. berkedudukan di 641 Lexington Avenue, New York, United State. Perusahaan yang mengeluarkan aplikasi Internet Download Manager (IDM). Software downloader paling banyak dipakai di seluruh dunia. Tuttorial berisi Petunjuk Pengintegrasian IDM dengan Browser Mozilla Firefox.   OK. Berikut ini kutipannya :  

IDM integration guide for Firefox - website archieves
Q. I've just updated Firefox to its newest version and IDM integration into Firefox stopped working. IDM does not take over downloads from Firefox anymore. What can I do to fix it?
Q. Firefox said it had disabled the IDM extension because it wasn't compatible. How do I resolve the problem?
Q. I cannot integrate IDM into FireFox 9 (FireFox 8, FireFox 7, FireFox 6, FireFox 5, FireFox 4, FireFox 3). What should I do?
1. Please make sure that you have installed the latest version of IDM by using Help->Quick Update menu item. Please use "Help->Quick Update" IDM main menu item to get the latest version of IDM.

IDM Quick Update

2. Don't forget to turn on the corresponding checkox for browsers that you use in IDM Options -> General tab.
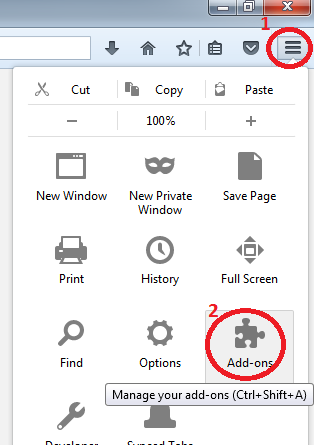
3. It's possible that you need to update IDM extension for Firefox. Pick "Tools->Add-ons" menu item in Firefox

Firefox add-ons dialog

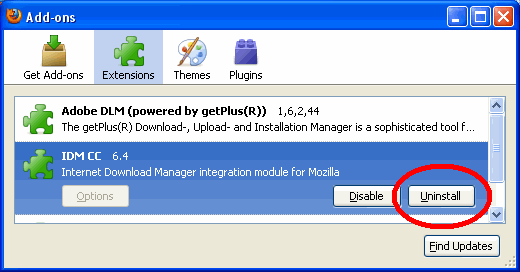
Add-ons dialog should open. Click on "Extensions" tab and find IDM CC (Internet Download Manager integration module for Mozilla) :

Firefox add-ons menu

3.a. If "Uninstall" button is available (like on the picture above), press this button and confirm deinstallation. Then close and restart Firefox browser. On next start, Firefox will find and install the latest version of IDM CC extension automatically using system registry. That's all.

3.b. If "Uninstall" button is not unavailable and if you are using the latest version of IDM and the integration does not work, it's possible that you use an old version of IDM extension. In this case open this web-page in FireFox browser that you need IDM to be integrated to, then press this button :

Install IDM extension

Silahkan ikuti instruksi-instruksi instalasi DI BAWAH INI, jika ada masalah apapun  atau kesulitan melakukan Instalasi Manual. Atau bacalah detailed instructions.

IDM integration guide for Firefox and other Mozilla based browsers

If you are using the latest version of IDM and the integration does not work, it's possible that you use an old version of IDM extension. In this case open this web-page in FireFox or in other Mozilla based browser that you need IDM to be integrated to, then press this button :

Install IDM extension

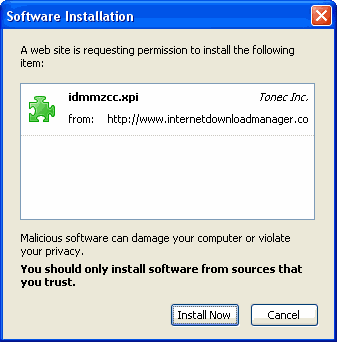
Depending on the version of your browser it will show a security warning on top of the current window with "Edit options..." or "Allow" buttons. If it shows "Allow" button, please click on it to allow the installation.

IDMCC extension installation allow

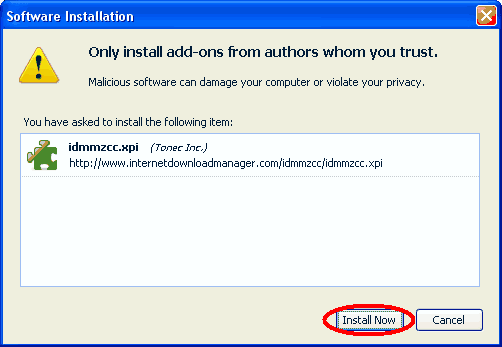
Then the following "Software installation" dialog should be opened by your browser.

IDMCC extension installation allow 1

Press on "Install Now" and confirm the installation. It will replace IDM extension to its newest version for Firefox and for other Mozilla based browsers.


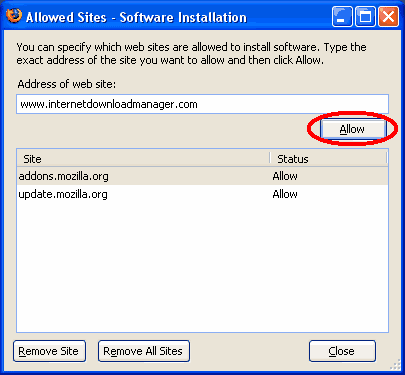
If your browser shows a warning with "Edit options..." button, click on it, then click "Allow" button on the next dialog.

IDMCC extension installation allow step 1

IDMCC extension installation allow step 2

Install IDM extension

Then click on "Install" button above again to install the extension and the following "Software installation" dialog should appear.

IDMCC extension installation allow step 2

Press on "Install Now" and confirm the installation. It will replace IDM extension to its newest version for Firefox and for other Mozilla based browsers.


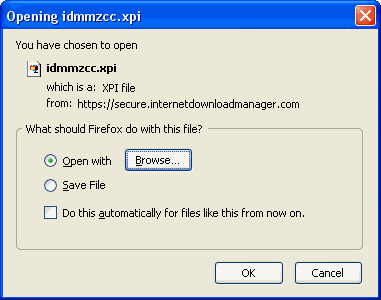
If you don't have a file association set for Mozilla extensions then the following dialog should appear :

Install IDM extension

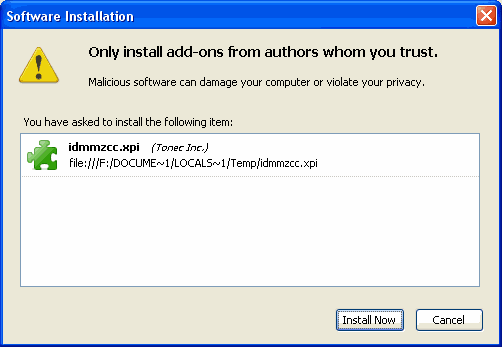
Press "Browse...", select FireFox (or another Mozilla based browser). Then the following extension installation dialog should be opened by your browser :

Install IDM extension

Press on "Install Now" and confirm the installation. It will replace IDM extension to its newest version for Firefox and for other Mozilla based browsers.

Internet Download Manager, Tonec Inc. 641 Lexington Avenue, 15th fl. New York, NY, 10022E-mail: info@tonec[DOT]com

 logo internet download manager© 1999-2008. All rights reserved.


read more website design

02 November 2011

Free USB Flash Drive Data Recovery Software – Don’t Format!!!


Apa jadinya jika setelah menancapkan Flashdisk tiba-tiba computer meminta format flashdsik tersebut, sekali-kali jangan dulu diformat, karena data akan hilang. Mengapa bisa terjadi? Ini ada beberapa kemungkinan, selain kemungkinan kerusakan fisik,  ada faktor virus yang menjadi sumber kerusakan.

Download Easus Data Recovery dari official website

Suatu kali saya menancapkan Flashdisk berisi data pekerjaan, namun tiba-tiba Flashdisk tersebut kosong dan minta diformat, padahal saya  tidak memiliki file back up data. Terpaksa putar otak cari solusi, hingga kutemukan cara berikut ini.

Pertama, saya mencoba membuka via Linux, …..  hasilnya flashdisk  tetap tidak terbaca. saya cuba pakai Safe Mode juga tetap tidak terbaca, scan dengan Smadav kemudian dengan  MacAfee  juga tetap tidak dapat dibaca.

Akhirnya, saya teringat software dari Easus yang pernah saya pakai untuk  partisi. Kali ini software yang saya download adalah Easus Data Recovery Wizard Free yang bisa didownlaod di official site-nya : http://www.easeus.com/.

Memanglah tampilan awalnya tidak begitu meyakinkan. Kemudian saya pilih menu Partition recovery dan saya pilih drive G tempat flasdisk yang rusak. Kemudian pilih next dan berjalanlah proses recovery. Alhamdulillah, file yang hilang pun terbaca kembali dan sukses disimpan.(File saya simpan di hardisk komputer, karena flasdisk rencana akan saya format ulang).

website design Archieves : What is USB flash drive?

A small, portable flash memory card that plugs into a computer USB port and functions as a portable hard drive with up to 2 GB of storage capacity. USB flash drives are touted as being easy-to-use as they are small enough to be carried in a pocket and can plug into any computer with a USB drive. USB flash drives have less storage capacity than an external hard drive, but they are smaller and more durable because they do not contain any internal moving parts.

USB flash drives also are called pen drives, key drives or simply USB drives.
usb drive data recovery
Data loss in USB flash drive - website archieves
Common causes and symptoms of USB flash drive data loss :
  • Accidently format USB flash drive.
  • Virus attack
  • Power surges & electro-static discharge
  • Not properly removing the USB flash drive from a computer.
  • Accidently delete files from USB flash drive.
  • The file system of USB flash drive is displays as raw.
  • Windows may ask if you want to format the USB flash drive
Data recovery software from USB flash drive - archieves of website design
Since most of the above things may cause data loss in USB flash drive, it is a must or good way to keep a free USB flash data recovery software for emergency.

Free USB flash drive data recovery software

Here we would like to introduce EaseUS free data recovery software - Data Recovery Wizard Free Edition for your USB flash drive data recovery. It solves all USB flash drive data loss problems - recover deleted files, or lost file due to software crash, formatted or damaged, virus attack and other unknown reasons. By the way, it also supports Memory card data recovery, CF card data recovery, external hard drive data recovery, Memory stick data recovery, etc.

free download easeus

Jika punya kasus serupa, jangan format flasdisk karena aplikasi ini bisa membantu mengembalikan data. Semoga bermanfaat.


read more website design
Penelusuran topik khusus di blog ini
Loading