Author by : Doublehorn
DAFTAR ISI
Protected by Copyscape Online Infringement Detector
aboutus website design services

Willkommen auf mein web blog

Best regard. I will do my best to make it interesting and useful. Greeting to toko online Prestashop!

07 November 2013

The most common SEO errors in website blog


SEO Friendly penting bagi website atau blog untuk meraih PageRank tinggi. Sayangnya sering terjadi kegagalan penerapan SEO. Kenalilah error paling sering dilakukan dalam praktek SEO.

Pernahkah ketika melakukan SEO, Anda mendapati perasaan tenggelam, merasa ada banyak hal salah? Banyak teknik SEO dipraktekkan namun statistik SEO tak berubah, sedikit sekali kemajuan, atau bahkan statistik SEO turun. Tentu sangat kecewa namun tidak ingin berhenti. Jangan khawatir! Anda tidak sendirian.

SEO-rror paling sering dilakukan oleh admin website

Mark Nunney memberitahu kita 12 kesalahan paling sering ditemukan dalam praktek SEO.

1. Missing the big picture

Most SEO advice is given for a single page, word or technique. But if a site is to be responsible for a profitable small business then in most situations it will need 100s of pages targeting 100s of 1000s of keywords using a wide range of techniques. All of these pages, keywords and techniques need to work together so you need a plan to coordinate that, including :

-  Keyword research looking for potential keywords with Wordtracker Keywords Tool & existing traffic
   with Wordtacker Strategizer.
-  Strategy (your prioritized groups of target keywords)
-  Site structure (matching your target keywords) and navigation to distribute link power around site
Onpage SEO
-  Link building with Wordtracker's new Link Builder tool and online PR.

To work at any scale beyond a micro-niche business, you must change your perspective from single (or exact match) keywords to keyword niches groups of keywords sharing the same seed ... ... so right now I'm helping a site selling slippers and I might focus a lot of SEO and link building on the single keyword slippers but I'm really interested in tens of 1000s of keywords containing slippers, including leather slippers, men's slippers, ladies slippers etc.

Wordtracker Strategizer is designed to work with this shift in perspective from single keywords to keyword niches.

2. Not having a keyword or SEO strategy

What are you trying to achieve? Most importantly your SEO strategy should serve the company, marketing and brand strategies. A keyword strategy is a prioritized list of the company's target markets' niches, as defined by the keywords used in those niches - the words and phrases used in search engines.

3. Putting too much trust in an SEO company

You need to get whoever you have approached to prove what they've done, even when you have a personal reference for that company. You should take a step back and ask yourself, "what is being delivered?" Make sure you are getting your money's worth.

Often they (businesses) will see a company with a nice website and they may be inclined to trust them because of that. Here are a few simple questions to ask any agency you might be talking to:

Often they (businesses) will see a company with a nice website and they may be inclined to trust them because of that. Here are a few simple questions to ask any agency you might be talking to:

Do you always give complete ownership of site analytics accounts to your clients? If not, why not? (The answer is they want to 'lock you in'.)

How do you build links other than paid, directories, press releases, article sites and using your own websites?

Can you list all the link building techniques you have planned for me, give the weighting you'll give to each and why?

Give examples of how your strategy and tactics might change with circumstances. If their given link building techniques include the likes of comment spamming and buying links ask: I understand they can work now, but what happens when Google stops them working?

(Following up on the question above) Remember the Florida update. If the person you're speaking to doesn't remember 'Florida', ask to speak to an SEO who does.

4. Having company structure  or systems that are unable to accommodate change

Change is always difficult. But combine it with something completely new and you've got a problem. The new thing is SEO and online marketing - neither is particularly well understood or even trusted, and in some cases companies have never heard of it.

Change is never going to happen unless those with authority and responsibility absolutely insist it does. This slows down many large companies and allows the small, who do embrace SEO, to do well. Here's a nice example - do a search for hotels in London, Paris or New York. You would think you would see all the big names at the top, but you'll see plenty of companies you've never heard of.


SiteJazzer Gives Immense Value to eCommerce Websites

“SiteJazzer helps me create an aesthetically appealing storefront on the homepage. It may cost a couple of hundred dollars to get a freelance web designer to come up with a similar piece of work.” Says Patrick Tan, President of EVALUSHOP INC.

SiteJazzer makes it easy for businesses and agencies to create and show off their web content in style. With SiteJazzer, display your customer testimonials and quotes as animated cards, create great-looking banners and leader boards and do much more!

See how an eCommerce website with an interactive Jazzer stands out by making the shoppers 'interact' on the site and giving them a great shopping experience! Click to download the case-study


5. Not coordinating SEO with your editorial, sales and marketing departments

New content without SEO to maximize the number of target visitors seeing that content is a waste.
SEO without marketing to convert those visitors is a waste.
Your content, SEO and marketing should work together as part of a process.

6. Not monitoring response or acting on results

You have to monitor response eg, the numbers buying your product or signing up to your newsletter.

You may find that the market niche you hoped would work ends up being lame. If so, move on.

Monitor traffic, rankings and response for relevant searches. If you are getting good or bad results you need to act appropriately. That might be moving on to the next target niche, or investing more resources into the same ones.

7. Poor content management systems

It's a cliche to say you need the right tools to do the job. One of SEO and online marketing's tools is a content management system (CMS) that gives you complete control over most of the content, on most of the pages, including site navigation, menus and all marketing. Not having that is like entering a car race on a scooter.

8. Letting developers control website content

Partly as a result of companies having no existing knowledge and systems to accommodate online marketing and SEO, those who build the website have by default often become in charge of its content.  But letting developers take control of online content is like letting the mechanic drive the racing car. Or buying a car from a Ford garage and letting the mechanics decide where you can drive.

Take control of your website.
The developer's job is to deliver the functions you want and keep the site working. What goes on the site and where and when is the responsibility of editorial and marketing, including SEO.

9. Not doing SEO now

Here's a simple point; every day you wait to start SEO means it will be more expensive to get the same results when you do start. If you can get to the top of Google for a collection of keywords this will give you momentum and help you stay at the top, and it becomes cheaper.

Serious search engine success allows for serious business success - put these things together and you've basically got a gold rush. If you don't do the work now it's going to cost you a fortune to do it in the future. There is a simple reason for this and it's inbound links.

10. Neglecting the importance of site structure and navigation

Most reasonable sites for reasonably sized businesses are going to need hundreds (sometimes thousands) of pages. If you have hundreds of pages you need an optimized site structure and an accompanying site navigation. Even on a small site it's possible to get this wrong and waste all work.

You might have wonderfully optimized pages and links but if you don't have your navigation right, or your structure isn't right then your success will be limited.

What should you do? It's hard to give a quick answer, but you should organize your site content into categories of related content. Let's say you had a site selling chocolate - you would have all your Belgian truffles in one place and chocolate cake recipes somewhere else, almost working as different sites with their own home page (category home pages.)

On larger sites, related categories can be grouped together into channels.

Make sure your home page links directly to your site's most important category pages. See Are your Superman Pages trapped in a basement full of kryptonite?

11. Neglecting your home page

Your home page is by far your most powerful page because most of your site's inbound links will come to there. Use that power with copy to both target your toughest keyword niches and help other niches with links to their category home pages.

You can test what works, trying keywords of varying degrees of difficulty and ambition.

12. Over-relying on your home page

This is just as problematic. There are only so many different keywords you can effectively target with one page. When success is achieved for a keyword niche with your home page - move that success to other pages using internal and external links.

About the Author  :  Wordtracker http://www.wordtracker.com


SEO-in-webmaster-mind! How-to-build website SEO Friendly?

read more website design

03 November 2013

Tutorial : Keyword guide for website blog


Welcome to the blogosphere!

Membicarakan Blogosphere, kita melihat jumlah blog berkembang sedemikian pesat, BLOG pertama diciptakan tahun 1997, kini lebih 145 juta blog. Banyak hal bisa dilakukan dengan blog, seperti cari uang, punya toko online, berbisnis mencakup seluruh dunia. bekerja dari rumah, akses informasi terbaru, update content dan mendapat uang dari monetize website.

Making a name for your website in internet

Pertama terjun ke dunia online, mulailah dengan yang paling mudah – Create a blog. Tetapi ingat! Content bagus saja tidak cukup, Anda harus punya strategi membuat dan membangun website. Strategi ini pada awal dan akhir untuk meraih PAGERANK tertinggi yang mungkin diraih oleh blog dalam SERP (Search Engine Result pages).

Strategi harus diawali dengan pertanyaan :
  • How are you going to make a name for yourself as a blogger?
Lebih 100 juta blog mempunyai tujuan sama, yaitu posisi terbaik di Google. sementara tidak ada buku peraturan dan kriteria jelas yang tersedia untuk Anda dan jutaan blogger. Jadi seperti berebut memegang ekor keledai di ruangan gelap. Gunakan strategi memenangkan kompetisi”

Awali strategi dengan menjawab pertanyaan “Apa Nama situs Anda?” Kita ingin nama paling kompetitif dalam memenangkan persaingan di search engine. Untuk itu silahkan kunjungi :
Selanjutnya selain membuat konten bagus Anda harus melakukan teknik SEO yang banyak membutuhkan waktu dan ketekunan. Strategi SEO memudahkan blog mendapatkan posisi terbaik yang mungkin diraih di mesin pencari Google.

Search Engine Optimization for website blog

SEO menjadi industri berkembang di sekitar usaha memaksimalkan posisi blog (website) di Halaman Hasil Pencarian Mesin Pencari (SERP). Yang didapat ialah hasil pencarian organik.

  • Hasil pencarian di Google Search Engine - diperolehkan dari pencocokan istilah pencarian (query), tidak memanfaatkan iklan berbayar, dan akan menguntungkan peringkat website tanpa melanggar aturan Google (jangan lakukan Black Hat SEO).

Proses-dan-elemen-search-engine-optimization
Teknik SEO ini akan menghasilkan tamu berkualitas, yaitu pengunjung yang sengaja mencari informasi penting dengan mengetik keyword tertentu (Query) pada search engine. Perkiraan keyword tersebut yang akan disisipkan oleh Copywriter ketika bikin content artikel.

Pencarian non-Organik dilakukan melalui iklan berbayar (Pay Per Click (PPC) bisa meningkatkan Pagerank, tetapi berapa biaya ekstra yang harus Anda belanjakan?  Berapa budget iklan untuk website?

Biaya yang harus dibayar tergantung pada keyword yang Anda gunakan. Jika keyword lebih populer, biaya semakin mahal. Blogger pemula dengan dana terbatas dapat mensiasati dengan memaksimalkan SERP, sementara pencarian non-Organik pun harus diminimalkan. 
  • Bagaimana caranya?  Lakukan riset keyword sendiri!
Dunia blogging sangat kompetitif, persaingan teramat sengit. Penggunaan keyword untuk blog bersifat Hit & Miss atau Trial and Error – Anda tidak akan pernah tahu hasilnya jika keyword Anda belum dicoba. Percobaan penggunaan keyword juga lebih bersifat SENI (art) daripada nilai ilmiah.

Penggunaan tools yang tersedia secara bebas bersama dengan banyak alat analisis dapat membantu menghasilkan kombinasi terbaik keyword pendek, menengah, dan panjang.
  • Anda harus memantau penggunaan keyword pesaing untuk menghemat waktu dan uang.

Keywords for website blog

Keyword punya posisi vital dalam SEO. Keyword menjadi bagian penting dari strategi website blog yang sukses. Keyword kuat akan menarik trafik kunjungan ke website blog, memberi kesempatan meningkatkan konversi dan memaksimalkan pendapatan dari pengiklan yang ingin berhubungan dengan Anda dan website lain yang ingin link ke website blog Anda. Sebagai pemeran blogger, gunakan momentum dan peluang Anda.
keyword-website-and-keyboard-button-computer
Types of Keywords in website blog
There are two types of keywords – short tail and long tail. Short tail comprise up to three keywords used together and long tail comprise four or more keywords. As a rule, short tail are more competitive as they are more general than long tail, yet long tail receive less hits but result in better conversion. You should be using a mix of short and long tail keywords to generate optimal results. The use of mid tail keywords may provide a perfect balance between competitiveness and conversion. Similarly, you could use short and medium tail keywords to build links and set the stage for long tail keywords.
Generating Competitive Keywords for website blog
Although there is a range of software that analyzes keywords, you can check keywords on Google and the other major search engines, such as Yahoo! and MSN. Search using the following methodology: intitle:[key phrase] andallintitle:[key phrase]. The results will give you a strong feel for how many other people are searching for similar keywords.

When you perform these searches, check out how much advertising there is and if it has been configured with keywords. A lot of advertising configured with keywords is a sure sign that the keywords are competitive.

SEO for Firefox also generates useful keyword data as does Google AdWords Keyword Tool. Use the exact match Local Search volume and Approximate CPC to assess keyword competitiveness. Also monitoring your competitors’ blogs and the keywords they use can save you time and money when it comes to formulating your own keywords. It is preferable to use a VPN proxy when conducting competitor analysis.

Memeriksa Keyword Density website blog

Untuk check kepadatan keyword silahkan kunjungi :

Keyword Density Tool : Part of SEO Tools
Optimalkan kepadatan keyword blog atau website!


.

read more website design

Related posts with CSS Effect on website blog Blogger


Pentingnya navigasi website

 Navigasi   penting! Navigasi memungkinkan Anda cepat menemukan content diinginkan. Ini membantu Search Engine memahami content apa yang menjadikan Webmaster Tools (Google) berpikir menganggapnya penting. Jika blog relatif baru, pikirkan!!! "Bagaimana reader pergi dari homepage ke halaman lain berisi content lebih spesifik?” Atau sebaliknya, ”Bagaimana reader navigasi cepat kembali ke Homepage?"

Related Post with Thumbnail widget in website blog

Sebelumnya saya posting di blog INI tentang link-link judul post di bawah artikel. Ada 2 post relevan dengan artikel sekarang, yaitu :


Berikut ini posting Related Post variasi ke-3 dalam memasang widget (script) related post untuk blog blogger dengan sedikit perbedaan. Contoh dapat dilihat di :


Setelah URL diatas dibuka, silahkan gulung halaman turun hingga dibawah “RELATED POSTS.” Arahkan cursor ke setiap link DIBAWAHNYA. Akan terlihat animasi saat tersentuh cursor. Untuk membuat Related Posts seperti itu Anda perlu tambahkan CSS3 transition, mengatur padding dan background position yang terpasang di setiap link.

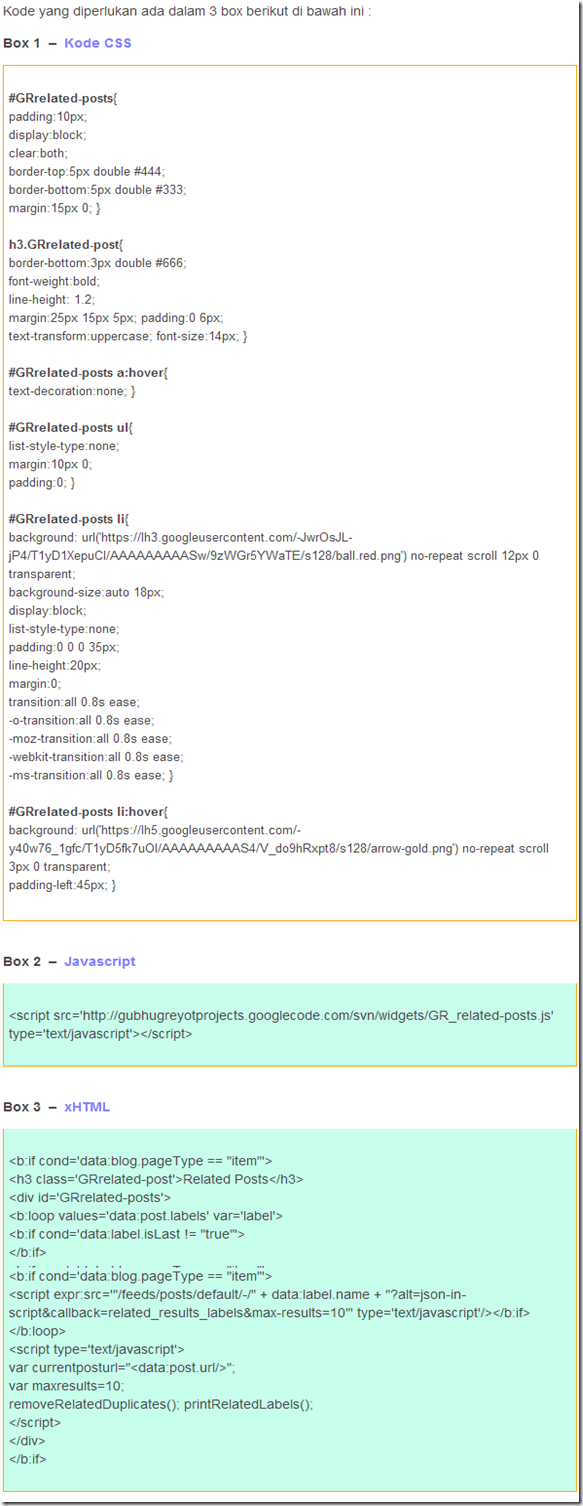
tiga source code untuk Related Posts with CSS3 Effects

Mohon maaf, source code yang dibutuhkan ditampilkan sebagai gambar karena memperlambat loading time blog kami, namun jika berminat isi code diatas silahkan klik :


Cara Penggunaan
  • Login ke Blogger  >>>  Design (Rancangan)  >>>  Edit HTML
  • Backup template
    Mengubah xHTML di bagian <body> punya resiko kegagalan yang mungkin menimbulkan kerusakan template, maka lakukan backup template seperti dibawah ini demi keamanan.
    • Klik Download Full Template
    • Simpan file template di folder computer (misalnya di folder My Document)
    • File backup ini digunakan untuk memulihkan template seperti sebelum dilakukan modifikasi dengan cara upload kembali ke blogger.
    • Cara upload :
      Klik browse. Temukan file backup di folder computer dan lanjutkan dengan klik upload.
  • Kembali ke Edit HTML dan Cari kode ]]></b:skin>
  • Letakkan kode CSS (snippet box 1) tepat di atas kode tersebut
  • Letakkan Javascript (snippet box 2) tepat di BAWAH kode tersebut
  • Sehingga :
                                        kode ]]></b:skin> berada diantara kode css dan javascript
  • SAVE TEMPLATE
  • Lanjutkan kembali dengan klik Expand Widget Template dan cari kode <data:top.authorLabel/>
  • Di atas kode <data:top.authorLabel/> ada beberapa kode lain seperti berikut 

<div class='post-footer'>
<div class='post-footer-line post-footer-line-1'>
<span class='post-author vcard'>
<b:if cond='data:top.showAuthor'>
<data:top.authorLabel/>


Letakkan xHTML (lihat isi Box 3) tepat di atasnya. Sehingga tersusun seperti berikut

posisi box XHTML Related Posts with CSS3 Effects
 SAVE TEMPLATE

Keterangan
  • Angka 10 merupakan jumlah posting ditampilkan di widget related posts. Ini dapat diubah sesuai jumlah yang Anda inginkan.
  • Untuk merubah tampilan related posts, perubahan cukup dilakukan pada kode css.

SELESAI  -   [Source]


That's all we know


read more website design

30 Oktober 2013

Argumen pilih website toko online Prestashop


Website store Prestashop : Sistem penjualan sophisticated

S ekelompok programmer Perancis menciptakan CMS web store (toko online) platform Prestashop, mulai release Agustus 2007. Mereka menjadikan transaksi online dilakukan dengan sangat mudah dan cepat. Sebagai sistem penjualan yang dilengkapi efek zoom, cara order, pembayaran, pengiriman hingga komunikasi pelanggan secara otomatis.

Lebih dari 10 Alasan memilih website toko online Prestashop

Berikut ini argumen penting memilih Prestashop.

1. Source code hasil decompress file zip mudah dilihat dengan Notepad

2. Web Developer lebih memungkinkan membuat modul independen

3. Cepat, baik saat loading website maupun dalam proses transaksi

4. Keamanan

4.1. Support terhadap SSL (disyaratkan web-server Apache. Untuk SpeedLite tidak bisa).
4.2. Login Back Office dan Front Office dengan password terenkripsi
4.3. PCI DSS Compliant
4.4. Password terenkripsi di Database
4.5. Ketahanan dari serangan hacker/kracker, biasa pakai metode XSS, CSRF, SQL injections,
        distant inclusions, path transversal (pernah ditest pakai addons Firefox untuk test ketahanan
        web dengan methode SQL injection dan XSS, hasilnya Prestashop OK).
4.6. Cokies yang unik dan terenkripsi.
4.7. Kemampuan blokir pengulangan password berlebihan (biasa karena  user lupa password)

5. Features

5.1. Kategori dan subkategori yang tidak terbatas
5.2. Group Attribute (unlimited) misalnya: ukuran, warna, berat etc.
5.3. Attribute (unlimited) misalnya: merah, hijau, S, M, L, 1kg, 2 kg
5.4. Kombinasi Attribute (unlimited) misalnya: baju warna merah-ukuran M
5.5. Generator kombinasi attribute otomatis
5.6. Spesifikasi produk (unlimited)
5.7. Gambar (unlimited) dengan generator resizing otomatis
5.8. Satu produk dengan banyak gambar (unlimited)
5.9. pembesaran gambar (zoom dan thickbox)
5.10 [Module] Watermark
5.11 [Module] Komentar pembeli untuk masing-masing produk
5.12 Bisa menampilkan dua harga (dengan pajak dan tanpa pajak)
5.13 Bisa memilih jumlah produk dalam 1 halaman
5.14 Bisa menampilkan jumlah stock yang tersedia
5.15 Pengurutan produk berdasarkan nama, harga, dan jumlah stok
5.16 Halaman produk bisa diprint
5.17 Pengecekan katalog seperti stok, produk tidak aktif, dsb
5.18 Kategori terbatas untuk masing2 group buyer –> buyer biasa berbeda dengan buyer grosir
5.19 Bisa menyisipkan attachment pada masing produk –> misal manual user, driver / software.
5.20 Diskon berdasarkan quantity pembelian (dalam persen)
5.21 Diskon berdasarkan quantity pembelian (dalam jumlah)
5.22 Referensi produk (ISBN-EAN13) –> berguna jika memakai barcode system
5.23 [Module] Wishlist
5.24 Bisa mengirimkan wishlish melalui email
5.25 Laporan pembelian produk di wishlist (kapan dan oleh siapa)
5.26 Managemen produsen/ merk
5.27 Managemen Suplier
5.28 [Module] Beritahu ke teman –> untuk mengirim email tentang info produk
5.29 Virtual Produk (Download) misalnya: MP3, PDF, ebook
5.30 [Module] Cross Selling –> Pelanggan yang membeli produk ini juga membeli ...

6. Statistic

6.1. [Module] Online visitors –> statistik tamu (visitors) dan pelanggan (custemers) yang online
6.2. [Module] Visits and visitors –> statistik visitors dan total kunjungan (visits) ke toko online
6.3. [Module] Orders and sales –> statistik order baik yang serius maupun fake, total sales (Rp)
6.4. [Module] Customers’ accounts –> statistik jumlah buyer yang membeli dan hanya coba-coba.
6.5. Module Customers’ profiles –> statistik berdasar gender, age, country, bahasa dan matauang
6.6. [Module] Visitors equipment –> statistik browser, Operating Systems dan plugin (Adobe
       Flash, Sun Java, Apple Quicktime, WMP, Adobe shockwave, Real Player)
       yang digunakan pengunjung.
6.7. Module Catalog statistics -> rating terjual per kategori, statistik produk belum pernah terjual
6.8. Purchase price of products (trade margin)
6.9. [Module] Products statistics –> statistik produk (berapa terjual dan berapa kali dilihat tamu)
6.10 [Module] Best customers –> statistik pelanggan terbaik yang membeli paling banyak
6.11 [Module] Visitor Origin –> statistik website referal, darimana tamu mendapat link toko online
6.12 [Module] Best products –> statistik product yang paling menguntungkan
6.13 [Module] Best Voucher –> statistik voucher yang paling banyak digunakan
6.14 [Module] Best categories –> kategori terbaik berdasar jumlah produk laku dan sering dilihat
6.15 [Module] Best suppliers –> statistik Supplier terbaik
6.16 [Module] Newsletter statistics –> Module Newsletter harus diaktifkan
6.17 [Module] Carriers distribution –> statistik pengiriman
6.18 [Module] Geo localization –> Menampilkan peta dunia yang menunjuk asal negara client
6.19 [Module] Pages not found –> statistik halaman yang tidak ditemukan browser
6.20 [Module] Shop Search –> statistik Keywords yang sering dicari
6.21 [Module] Google Analytics –> Mengintegrasikan script Google Analytics di toko online kita
6.22 [Module] GD (Artichow) visualization –> Untuk tampilan grafik di statistik
6.23 [Module] Flash (XML, SWF Charts) visualization –> Untuk tampilan grafik di statistik
6.24 [Module] Silverlight (Visifire) visualization –> Untuk tampilan grafik di statistik
6.25 [Module] Google Charts visualization –> Untuk tampilan grafik di statistik

7. Spoiler for Customer

7.1 Registerasi Pelanggan
7.2 Recovery Password jika lupa
7.3. Mengirim auto-email kepelanggan mengenai status pembelian
7.4. Group pelanggan –> misalnya pelanggan biasa dan grosir
7.5. Back up keranjang belanja
7.6. [Module] Loyalty system (points)
7.7. [Module] Customer referral program
7.8. [Module] Newsletter opt-in
7.9. [Module] Customers follow up (forsaken carts)
7.10 Voucher unutk pelanggan terbaik
7.11 Voucher untuk pelanggan yang telah membeli produk
7.12 [Module] Birthday Gift –> Hadiah ulang tahun untuk pelanggan
7.13 [Module] Allert Email –> Mengirim Email ke pelanggan

8. Spoiler for Order

8.1. Status order bisa diatur
8.2. Template auto-email
8.3. Pengaturan pembelian minimal
8.4. Pengaturan pembelian barang yang stoknya habis
8.5. Manajemen pengembalian barang
8.6. Penambahan stok dari barang yang dikembalikan
8.7. Nota pembelian dan pengiriman bisa didownload dalam bentuk PDF
8.8. Penawaran special –> diskon / kupon
8.9. Diskon dalam persen dan diskon dengan jumlah yang tetap
8.10 Kupon pada kategori, dengan jumlah minimal atau tidak, dikombinasikan atau tidak, per client
8.11 Voucher gratis ongkos kirim
8.12 Penawaran bungkus kado dan bungkus dengan bahan daur ulang
8.13 Biaya bungkus / packing

9. Spoiler for Payment

9.1. Methode Pembayaran tak terbatas, modulnya bisa di-download di addons.prestashop.com
9.2. Pembayaran dengan Mata uang berbeda setiap negara
9.3. Pembayaran disesuaikan dengan group pelanggan
9.4. [Module] Bankwire –> Transfer ke rekening Bank
9.5. [Module] Check –> Pembayaran dengan cek
9.6. [Module] Cash on delivery –> COD
9.7. [Module] Google Checkout
9.8. [Module] paypal
9.9. [Module] Moneybookers
9.10 [Module] Hipay

10. Spoiler for Shipping

10.1. Unlimited carriers
10.2. Carrier berdasarkan zona / negara
10.3. Email pemberitahuan status pengiriman
10.4. Manajemen tracking (AWB)
10.5. [Module] Courser shipping with DEJALA
10.6. [Module] Store pick-up –> Buyer mengambil sendiri barang di toko (tanpa jasa kurir)
10.7. Ongkos kirim bisa ditambah / diatur
10.8. Penghitungan ongkos kirim berdasarkan berat dan berdasarkan harga
10.9. Alamat pengiriman bisa berbeda –> misalnya dikirim ke saudara di luar pulau

11. Spoiler for Translation

1. Ada 3 standard bahasa: English, French, Spanish
2. Bahasa bisa ditambahkan dengan mudah (ekspor-impor)
3. Bahasa bisa diinstal tak terbatas – Sudah tersedia lebih dari 40 terjemahan
4. Online Translation tool

12. Spoiler for Localization

1. Support Mata uang berbeda (tak terbatas)
2. Format Mata Uang ($xx.xx atau xx.xx$ atau titik diganti koma, atau tanpa pecahan sen)
3. Sinkronisasi perubahan nilai tukar mata uang
4. Pengaturan Pajak (tidak terbatas)
5. Pajak per negara / zona
6. Pajak per negara bagian / propinsi
7. Timezone

13. Spoiler for SEO

1. SEO optimized
2. Meta tags (meta title, keywords…) management
3. [Module] Canonical URL – Duplicate content
4. [Module] Google Sitemap
5. URL rewriting
6. Permalinks

14. Spoiler for Template (Modular Theme)

1. Mudah modifikasi theme –> banyak web-programmer mengakui bikin theme prestashop mudah
2. Banyak theme gratis –> kunjungi forum prestashop.com
3. Compatible dengan browser IE6 –> meskipun IE6 sudah teramat jarang pemakainya
4. W3C compliant
5. Customizable homepage (text, pictures)
6. Customizable favicon
7. Breadcrumb
8. Multiple recipient contact form
9. Products scenes (products presentation)

15. Spoiler for Modules (Modular Addons)

Add-on mudah untuk install/ uninstall karena bersifat modular. Modul yang tersedia secara default :
1. [Module] Ajax cart –> memudahkan dan mempercepat transaksi, karena setiap klik ‘Add to Cart’
    produk langsung ditambahkan ke keranjang belanja tanpa perlu membuka halaman baru.
2. [Module] Tags cloud –> memudahkan klasifikasi produk dan mempercepat pencarian produk.
3. [Module] Ajax search –> dengan kemampuan Alias search
4. [Module] Tips on products pages –> memberitahu calon pembeli tentang produk yang dia lihat 
    kapan terakhir dibeli atau ditambahkan ke keranjang belanja
5. [Module] Featured products on the homepage –> menampilkan produk di halaman utama
6. [Module] Ads Block –> Menampilkan iklan
7. [Module] New products Block –> Menampilkan produk terbaru
8. [Module] Google Adsense Block–> Menampilkan iklan Google Adsense
9. [Module] Permanent Link Block –> Add bookmark sekali klik, link ke sitemap dan Contact Us
10. [Module] Currency Block –> Memilih Mata uang
11. [Module] Language Block –> Memilih bahasa
12. [Module] Products RSS feed
13. [Module] Related Product –> Menampilkan produk yang serupa (dalam kategori yang sama)
14. [Module] best sellers –> Menampilkan produk terlaris
15. [Module] User Account –> Tampilkan nama user, jumlah barang, total price keranjang belanja
16. [Module] Category Block –> Menampilkan kategori
17. [Module] Link Block –> Menampilkan link ke website lain
18. [Module] manufacturers Block –>Menampilkan daftar produsen / merk
19. [Module] suppliers Block –> Menampilkan daftar supplier / pemasok barang
20. [Module] My account block –> Informasi histori pembelian, voucher, profile pelanggan, etc.
21. [Module] Newsletter subscription block –> Menampilkan blok untuk berlangganan newsletter
22. [Module] RSS feed subscription
23. [Module] Payment Logo –> Menampilkan logo cara pembayaran, bank, paypai, kartu kredit
24. [Module] Third RSS feed block –> Menampilkan RSS
25. [Module] Fast search
26. [Module] Prices Drop –> Menampilkan produk yang sedang diskon
27. [Module] Footer links display –> Menampilkan link di bagian footer

16. Spoiler for Back Office

1. Contextual help in the Back-Office
2. Customizable Back-Office
3. Customizable shortcuts in the Back-Office
4. Integral search in the Back-Office
5. Multiple users management, and permissions (ACL)
6. Maintenance mode
7. IP authorization to reach the shop in maintenance mode
8. WYSIWYG text editor
9. Content management system
10. Affiliation program
11. Bulk lister – import .CSV files
12. Ability to add complementary modules
13. Modules On-Off in only one click
14. Subdomains management
15. Database backup (partial or full)
16. Automatic generation of .htaccess files
17. Automatic generation of robots.txt files
18. SMTP e-mails sending (with or without SSL-TLS) or PHP mail()
19. Specific typefaces management in PDF files
20. Products indexation for an optimized search
21. Live news from PrestaShop in the Back-office
22. Inventory management
23. SMS alerts (inventory, new order…)
24. Out of stock e-mail alerts
25. RSS feed
26. Export of the newsletter listed e-mails
13. Dukungan Forum yang luar biasa

17. Spoiler for Forum

1. Forum opensource paling aktif di kategori E-Commerce (140.000 registered member dalam
    waktu 3 tahun (sejak 2008-2010) rata rata 128 user baru/hari
2. Tersedia Forum khusus Bahasa Indonesia

18. Spoiler for nominator

Open Source E-Commerce Applications :
This category is reserved for the type of web applications that simplify buying and selling of products on the Internet. This will include complete e-commerce applications or frameworks designed for e-commerce. E-commerce modules or extensions to other systems can also be nominated. If a system is general purpose (like a CMS such as Drupal or Joomla!) the specific e-commerce functionality should be nominated, not the base system.

Open Source E-Commerce Applications finalists
1. Magento
2. nopCommerce
3. OpenCart
4. PrestaShop
5. Tomatocart


19. Spoiler for winner

Open Source E-Commerce Applications
This category is reserved for the type of web applications that simplify buying and selling of products on the Internet.

We are pleased to announce that PrestaShop has won the Open Source E-Commerce Applications category in the 2010 Open Source Awards.

Winner PrestaShop

1st Runner up: OpenCart
2nd Runner up: Tomato Cart
Congratulations to PrestaShop and commiserations to the Open Source projects that took part in the finals for this category but just missed out.


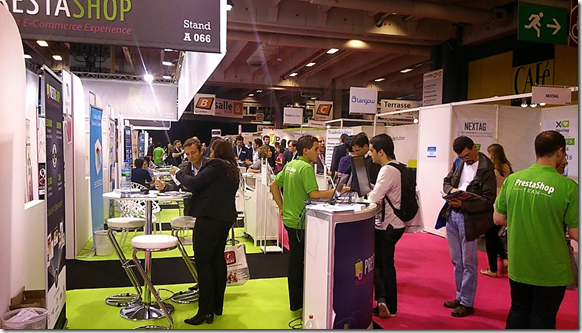
Prestashop in Salon du E-commerce 2013 Paris

20. Spoiler for history update Prestashop

Prestashop 1.0
Prestashop 0.8.1 — Aug 2007
Prestashop 0.8.2 — Sep 2007
Prestashop 0.8.3 — 28 Sep 2007
Prestashop 0.8.4 — Okt 2007
Prestashop 0.8.5 — 31 Okt 2007
Prestashop 0.8.5.1 — 31 Okt 2007
Prestashop 0.9 — 04 Des 2007
Prestashop 0.9.1 RC1 — 15 Des 2007
Prestashop 0.9.1 RC2 — 27 Des 2007
Prestashop 0.9.2 — 30 Des 2007
Prestashop 0.9.5 — 14 Jan 2008
Prestashop 0.9.6 — 31 Jan 2008
Prestashop 0.9.7 — 15 Feb 2008
Prestashop 1.0.0.1 (1.0 beta 1) — 29 Mar 2008
Prestashop 1.0.0.2 (1.0 beta 2) — 02 Apr 2008
Prestashop 1.0.0.3 (1.0 beta 3) — 05 Mei 2008
Prestashop 1.0.0.4 (1.0 beta 4) — 24 Jun 2008
Prestashop 1.0.0.5 (1.0 beta 5) — 09 Jul 2008
Prestashop 1.0 (1.0 final) — 01 Aug 2008 (Latest version 1.0)
Prestashop 1.1
Prestashop 1.1.0.1 (1.1 beta 2) — 02 Nov 2008
Prestashop 1.1.0.3 (1.1 beta 3) — 17 Nov 2008
Prestashop 1.1.0.5 (1.1 final) — 18 Des 2008 (Latest version 1.1)
Prestashop 1.2
Prestashop 1.2.0.1 (1.2 alpha 1) — 04 Apr 2009
Prestashop 1.2.0.2 (1.2 alpha 2) — 20 Mei 2009
Prestashop 1.2.0.3 (1.2 beta 1) — 09 Jun 2009
Prestashop 1.2.0.4 (1.2 beta 2) — 17 Jun 2009
Prestashop 1.2.0.5 (1.2 beta 3) — 01 Jul 2009
Prestashop 1.2.0.6 (1.2 beta 4) — 15 Jul 2009
Prestashop 1.2.0.7 (1.2 beta 5) — 24 Jul 2009
Prestashop 1.2.0.8 (1.2 final) — 29 Jul 2009
Prestashop 1.2.1.0 (1.2.1 final) — 12 Aug 2009
Prestashop 1.2.2.0 (1.2.2 final) — 27 Aug 2009
Prestashop 1.2.3.0 (1.2.3 final) — 09 Sep 2009
Prestashop 1.2.4.0 (1.2.4 final) — 15 Sep 2009
Prestashop 1.2.5.0 (1.2.5 final) — 26 Okt 2009 (Latest version 1.2)
Prestashop 1.3
Prestashop 1.3.0.1 (1.3 alpha 1) — 26 Jan 2010
Prestashop 1.3.0.2 (1.3 alpha 2) — 25 Feb 2010
Prestashop 1.3.0.3 (1.3 beta 1) — 09 Mar 2010
Prestashop 1.3.0.4 (1.3 RC 1) — 15 Apr 2010
Prestashop 1.3.0.5 (1.3 RC 2) — 16 Apr 2010
Prestashop 1.3.0.6 (1.3 RC 3) — 21 Apr 2010
Prestashop 1.3.0.7 (1.3 RC 4) — 05 Mei 2010
Prestashop 1.3.0.8 (1.3 RC 5) — 12 Mei 2010
Prestashop 1.3.0.9 (1.3 RC 6) — 12 Mei 2010
Prestashop 1.3.0.10 (1.3 RC 7) — 20 Mei 2010
Prestashop 1.3.0.0 (1.3.0 final) — 25 Mei 2010
Prestashop 1.3.1.0 (1.3.1 final) — 03 Jun 2010
Prestashop 1.3.2.3 (1.3.2 final) — 01 Okt 2010 (Latest version 1.3)
Prestashop 1.4
Prestashop 1.4.0.1 (1.4 alpha 1) — 22 Jun 2010
Prestashop 1.4.0.2 (1.4 alpha 2) — 10 Nov 2010
Prestashop 1.4.0.3 (1.4 alpha 3) — 25 Nov 2010
……………………. x
Prestashop 1.4.8.2 — Juli 2012
Prestashop 1.4.9.0 —
Prestashop 1.5.1.0 —  September 2012.
Prestashop 1.5.2.0 —  November 2012.

PRESTASHOP TERBARU : Prestashop_1.6..x.x   (ter-update Oktober 2013)

Di ringkas dari berbagai Sumber :
http://sourceforge.net/projects/prestashop/
http://www.prestashop.com dan http://www(dot)kaskus.us/showthread.php?t=6090020
Disarankan : Gunakan versi final. Versi alpha, beta dan RC hanya untuk test/ development.

CATATAN
Ditemukan cacat pada versi 1.5.2.0 yaitu pelanggan tak bisa LOGIN meski sudah submit sebagai pelanggan sehingga memaksa saya kembali ke versi sebelumnya (down-grade) Prestashop 1.5.1.0


That's all we know

read more website design

29 Oktober 2013

Cara belanja mudah di web toko online Prestashop


S ecara default ada 5 tahap di sistem penjualan website toko online Prestashop, yaitu :

Berbelanja di website toko-online Prestashop

Berikut in tahap-tahap atau proses berbelanja di toko online Prestashop.

Shopping cart summary

Tahap pertama ini tampak di halaman “Shopping cart summary” Setelah Anda selesaikan pemilihan produk ingin dibeli. Secara teknis halaman ini muncul setelah Anda tekan tombol CHECKOUT. Check kembali item produk dibeli. Anda bisa membatalkan pembelian item dengan menekan tombol “DELETE” atau menambahkan belanjaan dengan menekan tombol “Continue Shopping.” Selanjutnya tekan “NEXT” untuk melanjutkan ke tahap berikut.

Login

Halaman LOGIN muncul setelah menekan tombol “NEXT” pada tahap “Ringkasan Keranjang Belanja.” Jika Anda pengunjung baru, silahkan tekan “Membuat Account.” Jika sudah punya account ke toko-online tersebut, maka masukkan alamat email disertai password untuk akses. Jika lupa password, llik “Lupa Password” untuk mendapatkan password baru.

Addresses

Tahap ketiga ini tampak setelah Anda menyempurnakan LOGIN yang memberitahukan Alamat Tagihan dan
Alamat Pengiriman, konfirmasi Alamat Pengiriman dengan memilih pada menu Dropdown dan memberi tanda Centang (check). karena mungkin Anda menginginkan perubahan alamat pengiriman.

Shipping

Halaman yang menginformasikan jasa kurir yang dipakai (misalnya, TIKI. POS atau JNE). Biaya pengiriman (jika ada) segera terlihat setelah memastikan alamat pengiriman benar (dengan menekan tombol NEXT). Silahkan beri tanda centang pada kotak Term of Services dan tekan NEXT.

Choose your payment method

Tahap terakhir ini akan memunculkan opsi cara bayar yang ditawarkan oleh penjual toko online Prestashop. Silahkan memilih cara membayar yang Anda sukai.

prosedur shopping di toko online prestashop


Selamat berbelanja di toko online Prestashop


read more website design

26 Oktober 2013

Tip internet : How to delete cookies from browser


Anda mungkin punya Adobe Local Shared Objects, dikenal juga sebagai LSOs atau Flash cookies, di computer. Biasanya internet user tidak dapat menghapus cookies ini dengan browsers controls. Tetapi jangan khawatir, website resmi Adobe menawarkan tools control Flash cookies di computer. User Firefox bisa memanfaatkan add-on untuk mendeteksi and delete Flash cookies.

delete Cookies browser internet di computer - arsip website

Sebagian besar cookies mudah dihapus. Topik Posting blog  - website design – kali ini menghapus cookies disesuaikan dengan browser Anda. Ikuti saja instruksinya.

Google Chrome
Google browser cookies
Click on the "Tools" menu and,
select "Options"
Click the "Under the Bonnet" tab, locate the "Privacy" section and,
click the "CLEAR BROWSING DATA" button.
Select "Delete cookies and other site data" to delete all cookies from the list
(alternatively, you can remove all cookies created within a specific time period by selecting the period you want from the dropdown list).
Select "Clear browsing history" to delete traces of which websites you've visited.
Select "Clear download history" to delete records of which files and programs you've downloaded.
Select "Empty the cache" to delete cached website pages.
You can also delete saved passwords (which log you into websites),
and saved form data (such as your name and address).
Then click on the "CLEAR BROWSING DATA" button.
Click on the CLOSE button when you've finished.

Mozilla Firefox
Click on Tools  >>  Options (or Edit | Preferences on Linux)
Select Privacy

In the Cookies panel, click on Show Cookies

To remove a single cookie click on the entry in the list,
and click on the REMOVE COOKIE button.
To remove all cookies : click on >> the REMOVE ALL COOKIES button

Mozilla

Choose Cookie Manager from the Tools menu.
Choose Manage Stored Cookies.
Remove any cookie from the list, or remove all cookies.

Mozilla Firebird

Click on Tools, then Options
Select the Privacy icon in the left-hand panel
Click on Cookies
Click on Stored Cookies
To remove a single cookie click on the entry in the list,
and click on the REMOVE COOKIE button
To remove all cookies click on the REMOVE ALL COOKIES button.

Internet Explorer (all other versions)

Internet Explorer saves cookies in more than one location, depending on the version of the browser and the version of Microsoft Windows being used.
The best way to find and delete them is to close Internet Explorer then use your file management software (such as Windows Explorer) and search for a folder called 'cookies'.

Internet Explorer 9

Open Internet explorer window
Click the TOOLS button
Point to “safety” and then click “delete browsing history”
Tick the “cookies” box, then click “DELETE”

Internet Explorer 8

Click "Safety" on the Command bar
Select "Delete Browsing History"
Select the option for cookies and click "DELETE"

Alternatively, Internet Explorer 8's new

In Privatebrowsing feature allows users to browse the internet without recording information from visited sites (including cookies). To use In Private mode :
Click "Safety" on the Command bar
Select "InPrivate Browsing"

Internet Explorer 7.x

Exit Internet Explorer 7, and then exit any instances of Windows Explorer
Click START, click RUN, type inetcpl.cpl, and then press ENTER
On the General tab, click DELETE under Browsing History in the Internet Properties dialog box
In the Delete Browsing History dialog box, click DELETE COOKIES
In the Delete Cookies dialog box, click YES.

AOL 8 and 9

Sign on and select Settings from the toolbar.
Version 9.0 users should select the By Category tab and click the Internet [Web] Options link, while for Version 8.0 and below click Internet Properties (WWW).
Click Settings.
Note: Windows Vista will see more than one Settings button. Click the button in the Browsing history section.
Click View Files. Your list of cookies (plus your other temporary internet files) will be displayed.
If you wish to delete any of the cookies or files, right-click on them and choose DELETE.

Netscape Navigator 7.x
Choose Cookie Manager from the Tools menu.
Choose Manage Stored Cookies.
Remove any cookie from the list, or remove all cookies.

Netscape Navigator 6.x

Choose Cookie Manager from the Tools menu.
Choose Manage Stored Cookies.
Remove any cookie from the list, or remove all cookies.

Netscape Navigator 4.x

In Netscape, all cookies are stored into one file, called Cookies.txt, in the user preferences folder, making them easy to find and delete. The folder can be located by using your file management software to search your hard disk drive for "cookies.txt".
Users of Netscape Navigator 4.x may also stop cookies from being written to the hard drive, by making the cookies file read only. However, even if the browser can't "write" cookies to the hard drive, it can still cache them, and it may create a new cookie file.

Opera
To delete all cookies at the end of every session, select it in the privacy settings under Tools > Preferences.
Click on Manage cookies to delete specific cookies or cookies from specific domains.
To delete all cookies immediately, go to Delete private data on the Tools menu.

Deepnet Explorer 1.1+

Choose Tools and then Internet Options
Click the Privacy tab
Move the slider to choose your preferred settings.

Apple Macintosh

Microsoft Internet Explorer 5 (MacOS X)

Choose Preferences from Explorer menu
Select Receiving Files options
Select Cookies
Select the Cookies to be deleted from the list
Press DELETE button

Microsoft Internet Explorer 5 (MacOS 9)

Choose Preferences from Edit menu
Select Receiving Files options
Select Cookies
Select the Cookies to be deleted from the list
Press DELETE button

Safari 1.0 (MacOS X)
Choose Preferences from Safari menu
Select Security icon
Press SHOW COOKIES button
Select the Cookies to be deleted from the list
Press DELETE button

Opera
To delete all cookies at the end of every session, select it in the privacy settings under Opera > Preferences
Click on Manage cookies to delete specific cookies or cookies from specific domains.
To delete all cookies immediately, go to Delete private data on the Tools menu.

Other

WebTV
From the Home page, select Help
Select Utilities Tool
Select Reset Cookies
Power off the WebTV for 60 seconds
Cookies should be deleted when you turn the WebTV back on again

MSNTV2
From the Home page, select Settings
Select Web Appearance and Security
Select Delete Cookies

Source : http://www.aboutcookies.org/page-2


That's all we know


read more website design

25 Oktober 2013

SEO : Analisis website blog dengan Woorank Service


Semua posting website atau blog di internet punya kemungkinan dideteksi Search Engine. Tapi situs tanpa sentuhan SEO biasanya membutuhkan waktu lama. Selain itu kecil kemungkinan bisa berada pada halaman depan hasil pencarian. Untuk memperbesar peluang artikel posting ditampilkan di bagian teratas di halaman pertama hasil pencarian search engine (SERP) dibutuhkan upaya Optimalisasi SEO dan teknik SEO.

Optimalisasi SEO merupakan metode pengembangan pada website agar lebih mudah ditemukan oleh situs pencari seperti Google, Yahoo, Bing dan situs pencari lain.

Website SEO Review : Woorank Services

Woorank Services adalah layanan berbasis website untuk mengecek kualitas SEO yang ada pada suatu website atau blog. Woorank tidak hanya mengecek kualitas SEO pada website, tetapi juga memberi saran tips meningkatkan kualitas SEO.

Cara mendapatkan layanan dari website Woorank Services

  1. Layanan Woorank Services diakses via official site http://woorank.com.
  2. Masukkan URL website Anda disamping tombol “Website Review.”
  3. SELESAI
Layanan Woorank akan menganalisa website Anda. Memberi penilaian website berdasarkan kualitas SEO. Kita bisa melihat Statistik dan apa saja yang harus diperbaiki. Untuk mendapatkan tips SEO, cari saja tanda kotak merah berisi silang (x) atau tanda Peringatan (!) Klik saja kotak merah tersebut dan woorank akan memberikan masukan rekomendasi berupa tips SEO.

Website Review SEO Tool WooRank

Terdapat beberapa poin penilaian yang dilakukan oleh Woorank Services, antara lain :
  • Top 5 Priorities
  • Visitors
  • Social Monitoring
  • Mobile
  • SEO Basics
  • SEO Content
  • SEO Links
  • SEO Keywords
  • SEO Authority
  • SEO Backlinks
  • Usability
  • Security
  • Technologies
Contoh tampilan hasil Analisis Layanan Woorank untuk blog ini website-download.blogspot.com dengan score SEO 74.6 (skor  tertinggi 100).

SEO score blog website design

An example : Top priorities for website-download.blogspot.com :

  1. Fix the errors in the code syntax
  2. Add your company in the DMOZ directory
  3. Be more consistent with your keywords
  4. Book your brand on Twitter
  5. Promote your website on Social Media

Optimize : website-download.blogspot.com !
129 personalized tasks for online marketing success!
Start Your Free Trial


That's all we know


read more website design

Merancang website blog dengan Dreamweaver


Dreamweaver di-release oleh Adobe Systems sebagai aplikasi HTML editor website design (rancang website dan blog) secara visual karena didukung fitur WYSIWYG (What You See Is What You Get). Website designer Pemula tidak lagi berurusan dengan tag kode HTML, CSS maupun Javascript saat merancang website. Software ini lebih praktis dibandingkan harus membuat kode HTML, CSS dan script js. Tutorial berikut menjelaskan bagaimana menggunakan Dreamweaver untuk edit website blog.

Ketika dokumen Adobe Photoshop (download : situs_bisnis.zip) tersimpan dalam bentuk web, maka secara otomatis akan membuat tag html sendiri sehingga tidak perlu susah-payah mengetik kode html. Ini dibuktikan seperti gambar berikut :

dreamweaver for editing website

Website Design : Tutorial Penggunaan Dreamweaver 

1.     Mengubah objek menjadi background website page

Jika image berfungsi sebagai tombol, Anda dapat menambahkan menu pull-down agar tampilan website lebih menarik atau membuat tombol dalam bentuk mouse-over dan sebagainya. Pada bagian ini, kita bahas teknik penggantian objek gambar menjadi Background agar kita dapat memasukkan beberapa komponen di dalamnya (teks maupun grafik).
  1. Bukalah file index.html menggunakan Macromedia Dreamweaver.

    Gambar 1 dreamweaver
  2. Setelah file terbuka, tentukan terlebih dahulu image mana saja yang akan dijadikan background dan bagian mana saja yang akan dijadikan sebagai tombol. Sebagai contoh, klik image di bagian bawah teks New Product.

    Gambar 2 dreamweaver
  3. Di bagian Properties, tertulis Src = images/index_26.gif. Hal itu berarti kita tidak bisa memasukkan teks di atas gambar tersebut karena objek tersebut adalah image, bukan background. Tekan DEL untuk menghapus.

    Gambar 3 dreamweaver
  4. Klik Background URL of cell untuk memilih gambar yang akan dijadikan background. Karena nama file yang baru saja dihapus adalah index_26.gif maka gunakan file tersebut sebagai background.

    Gambar 4 dreamweaver
  5. Ketik images/index_26.gif pada kolom Bg.

    Gambar 5 dreamweaver
  6. Lakukan hal sama pada bagian lain jika ingin dijadikan sebagai background agar kita dapat memasukkan objek berupa teks, animasi, maupun gambar.

2.     Memasukkan objek sebagai elemen website page

Objek yang dimaksud dapat berupa animasi, gambar, maupun teks. Dalam Macromedia Dreamweaver, proses memasukkan objek sangat mudah karena sudah disediakan tool lengkap. Anda tinggal memilih objek apa yang akan dimasukkan. Berikut ini pembahasan masalah teknik memasukkan objek teks.
  1. Letakkan kursor pada tempat yang akan ditambahkan teks.

    Gambar 11 dreamweaver
  2. Pada panel Properties, aturlah beberapa spesifikasi seperti nampak pada gambar berikut.

    Gambar 12 dreamweaver
  3. Ketik beberapa kalimat berisi berita, kemudian aturlah format teks tersebut seperti nampak pada gambar berikut.

    Gambar 13 dreamweaver
  4. Anda bisa memasukkan image di antara teks tersebut. Untuk melakukannya, letakkan kursor di awal paragraf kemudian pilih menu INSERT > IMAGE.

    Gambar 14 dreamweaver
  5. Pilih file gambar yang akan dimasukkan dalam dokumen.

    Gambar 15 dreamweaver
  6. Jika berhasil memasukkan gambar, maka akan terlihat objek tersebut berada di depan paragraf. Namun posisinya masih kurang sempurna karena susunan teks terdorong oleh gambar tersebut.

    Gambar 16 dreamweaver
  7. Agar tampilan rapi, Anda setting posisi gambar sehingga seluruh teks akan berada di sebelah kanan gambar. Untuk melakukannya, pada panel Properties pilih Left untuk Align.

    Gambar 17 dreamweaver

3.     Membuat link navigasi website blog

Menu yang mudah digunakan (user friendly) dapat membantu user  ketika mencari informasi. Sebaiknya gunakan tombol menu yang umum, seperti: Home, Product, Service, dan Contact Us

Pada Macromedia Dreamweaver, kita membuat Pop-up Menu, dan Jumping Menu secara mudah. Anda tidak perlu susah-payah menuliskan script panjang dalam bahasa Javascript karena telah disediakan tool yang sangat mudah dan fleksibel.

3.1. Membuat pop-up menu website page

Keunggulan software Macromedia Dreamweaver dibandingkan aplikasi lain sejenis adalah adanya tool untuk membuat menu pop-up yang dibuat dengan bahasa Java. Bagi yang masih awam dengan Java, tidak perlu bingung karena disediakan panel Behavior untuk memudahkan pembuatan menu Pop-Up.

Sebelum membuat menu Pop-Up harus menyiapkan nama file sebagai link. Sebagai contoh : ketika user memilih menu PC maka yang akan muncul adalah pilihan nama computer seperti Acer, HP, BenQ, dan lainnya. Dan ketika user memilih salah satu opsi (Acer) maka akan terhubung ke file tersebut.

Dengan demikian, Anda harus membuat beberapa file dengan bentuk interface yang sama seperti halaman utama, yaitu menyimpan dengan nama lain (Save As > acer.html). Diasumsikan, Anda telah punya beberapa file sebagai link yang dimaksud.
  1. Pertama, klik menu PC.

    dreamweaver 21 dreamweaver
  2. Jika panel Behaviors belum muncul, aktifkan dulu dengan cara pilih menu Window > Behaviors.

    dreamweaver 22
  3. Pada panel Behaviors (ada di sebelah kanan), klik tombol Add (tanda plus) untuk membuka menu.

    dreamweaver 23.gif
  4. Selanjutnya pilih Show Pop up Menu.

    dreamweaver 24.gif
  5. Setelah klik pilihan tersebut, akan muncul kotak dialog Show Pop-up Menu yang masih kosong.

    dreamweaver 25.gif
  6. Pada Tab Contents, masukkan nama menu pada kolom Text (misal: Acer).

    dreamweaver 26.gif
  7. Kemudian masukkan alamat URL pada kolom Link.

    dreamweaver 27.gif
  8. Selanjutnya pada kolom Target, pilih _parent.

    dreamweaver 28.gif
  9. Untuk membuat menu baru, klik tanda (+) di bagian atas. Lakukan hal sama seperti pada tahap 6.

    dreamweaver 29.gif
  10. Klik TAB APPEARANCE untuk setting warna teks dan background pop-up menu. Tentukan jenis dan ukuran font. Lalu tentukan warna teks dan warna cell ketika mouse berada di atas teks.

    dreamweaver 30.gif
  11. Klik TAB ADVANCED untuk menentukan lebar, tinggi dan warna border kotak pop-up menu.

    dreamweaver 31.gif
  12. Klik TAB POSITION untuk menentukan posisi pop-up menu.

    dreamweaver 32.gif
  13. Setelah selesai klik OK. Untuk melihat hasilnya, klik tombol F12.

    dreamweaver 33.gif
  14. Untuk latihan, buatlah pop-up menu pada tombol lain.

3.2. Membuat tombol Roll-over Image 

Macromedia Dreamweaver selain menyediakan tool untuk membuat Pop-Up Menu juga menyediakan tool untuk membuat Roll-over Image sebagai tombol. Yang harus dilakukan adalah menyediakan 2 gambar berukuran sama tapi warnanya berbeda.
  1. Buatlah duplikasi gambar tombol yang telah ada.

    dreamweaver 41.gif
  2. Kemudian editlah file hasil duplikasi tersebut menggunakan Adobe Photoshop. Pilih menu IMAGE > ADJUSMENT > HUE/SATURATION.

    dreamweaver 42.gif
  3. Setelah muncul kotak dialog HUE/SATURATION, aktifkan pilihan COLORIZE. geser Slider Hue maupun Saturation sesuai kebutuhan. Setelah selesai klik OK, simpan dokumen tersebut dengan menekan CTRL+S.

    dreamweaver 43.gif
  4. Sekarang kembali ke Macromedia Dreamweaver. Klik gambar About Us.

    dreamweaver 44.gif
  5. Hapuslah objek tersebut dengan cara menekan tombol DEL. Selanjutnya pilih menu INSERT > IMAGE OBJECTS > ROLLEVER IMAGE.

    dreamweaver 45.gif
  6. Setelah muncul kotak dialog Insert Rollover Image, berilah nama gambar pada kolom Image name kemudian tentukan gambar asli pada kolom Original Image. Untuk mempermudah pencarian file, klik tombol BROWSE. Tentukan pula file untuk gambar rollover pada kolom Rollover Image.

    dreamweaver 46.gif
  7. Masukkan teks alternate di kolom Alt. Tentukan nama file sebagai link saat tombol tersebut di-klik.

    dreamweaver 47.gif
  8. Untuk melihat hasilnya, tekan tombol F12.


Be Blogger!

read more website design

24 Oktober 2013

Buat database table phpMyAdmin website


Website    minus database adalah omong kosong. Database website jika tidak ada tabel Query maka website tidak ada apa-apanya. Pertama, perlu membuat database dengan aplikasi MySQL di cPanel (Control Panel) sebelum membuat website karena database tersebut masih kosong. Kita harus membuat banyak tabel untuk menjadikannya "rumah" bagi website.

Jika menggunakan template website pihak luar, misalnya Blogger, WordPress, Prestashop dan lainnya, kita tidak perlu membuat tabel, karena saat install, otomatis juga import tabel-tabelnya. Kita hanya perlu membuat database baru sebelum install template website.

Kita perlu ekspor impor tabel atau bahkan membuat tabel sendiri. Untuk itu kita perlu tahu :

Bagaimana mengelola database beserta tabelnya?

Membuat Tabel Melalui Halaman phpMyAdmin - website files

  1. Buka Database baru, misalnya, nama database user_test
    (Silahkan tinjau ulang artikel Cara Membuat Database Baru di phpMyAdmin)
  2. Klik pilihan menu "Create Table on Database" user_test

    Sehingga tampak seperti ini :

    halaman phpMyAdmin membuat tabel
  3. Masukkan nama tabel dan jumlah field.
  4. Klik tombol GO (menyimpan).
  5. Pada screen pembuatan tabel, masukkan nama-nama "field" beserta “properti yang sesuai
  6. SAVE

Corresponding Properties of Table - website archives

Kita harus pilih jenis data yang akan disimpan dalam
field. Detail opsi yang mungkin ditemukan di dokumentasi resmi MySQL Data Types  atau properti yang terkait dengan tabel meliputi :

Length/Values
Masukkan panjang field. Jika tipe field "enum" atau "set", masukkan nilai pakai format ini: 'a','b','c'...

Collation
Pick the data collation for each of the fields.

Attribute
Atribut yang boleh digunakan :
  • BINARY – pemeriksaan field berupa binary, sebagai contoh utf8_bin
  • UNSIGNED -  bidang nilai numerik berupa nilai positif  atau 0
  • UNSIGNED ZEROFILL - bidang nilai numerik berupa nilai positif  atau 0, dan mengarahkan nol ditambahkan ke suatu angka
  • ON UPDATE CURRENT_TIMESTAMP – nilai untuk field tipe data memiliki  “current timestamp”  karenanya nilainya default, dan otomatis ter-update.
Null
Disini kita tentukan apakah nilai kolom dapat menjadi NULL. Lebih lanjut tentang nilai NULL dapat ditemukan dalam MySQL documentation yang sesuai.

Default
Property ini membolehkan mengatur nilai default untuk field tertentu.

Extra
Dalam Extra property, Anda dapat menentukan :
  • Apakah nilai field merupakan auto-increment
The radio buttons that come below define whether there is an Index defined for the particular field and specify the Index type.

Comments
Anda bisa menambahkan komentar, yang di dalamnya termasuk database sql code.


Akhirnya kita dapat menyertakan tabel komentar, memilih Storage Engine MySQL & Collation-nya. Setelah OK, klik SAVE.

Jika mau tambah lebih banyak Field, tentukan spesifikasi dan jumlah field. Lalu klik GO. Hasilnya adalah tabel database yang sudah diubah beserta “corresponding MySQL query

membuat tabel database phpMyAdmin
Selanjutnya mengisi tabel dengan data.

How to Add Content in a Database Table? - website files

Untuk menambahkan records ke tabel, lakukan ini :
  1. klik tab INSERT

    Menambah record data field phpMyAdmin
  2. Masukkan data ke field sesuai.
  3. Klik GO untuk menyimpan.
Pada bagian paling bawah terlihat menu drop-down berlabel Restart insertion with x rows.

Kita bisa memilih jumlah baris plus data,  sekaligus disisipkan. Secara bawaan nilainya  2. Pengabaian kotak centang memungkinkan mengabaikan data yang dimasukkan di bawahnya. Maksudnya, ini tidak akan ditambahkan.

Anda dapat melihat catatan yang baru dimasukkan dengan klik tab BROWSE.

Penyisipan data tabel halaman phpMyAdmin

Anda edit atau menghapus record dengan klik icon yang sesuai.
Untuk menyisipkan records lebih banyak, kembali ke tab INSERT dan ulangi prosedurnya.

How to Backup a Database of website? 

Setelah siap, Anda dapat membuat backup database melalui tab EXPORT.

kelola database halaman phpMyAdmin
  1. Pilih tabel ingin di-ekspor.
  2. Biarkan pilihan tombol  tetap pada opsi SQL.
  3. Biarkan centang pada opsi Structure and Data.
  4. Pilih SAVE AS FILE. Beri tanda centang (checkbox).
  5. klik GO.
Dengan cara ini akan tersimpan file dump SQL, struktur database dan content di computer.

Jika database besar sangat banyak record, Server timeout value bisa terjadi.   Untuk itu, kita bisa ekspor database dalam beberapa batches. Temukan detail di  MySQL Knowledge Base.

How to Restore a Website Database Backup?

Untuk restore database backup, lakukan berikut :
  1. Gunakan tab IMPORT.

    import tabel database pada phpMyAdmin control panel
  2. Klik tombol BROWSE
  3. Pilih FILE BACKUP DATABASE dari computer.
  4. Pilih charset file dari menu drop-down yang sesuai.
Jika file terlalu besar, akan terkendala timeout server MySQL, sehingga dapat menghentikan aksi impor.

kemudian melanjutkan dengan menentukan jumlah query data import yang akan dilewati dari awal file. Dengan cara ini Anda melewatkan permintaan impor (
imported query) dan melanjutkan dari titik interupsi.

Selain itu Anda dapat memilih modus SQL compatibility dari file yang diimpor. Anda dapat menemukan rincian lebih lanjut dalam dokumentasi Server SQL Modes

Artikel relevan: Cara Membuat Database Baru di phpMyAdmin

Source : www.siteground.com/tutorials/phpmyadmin/phpmyadmin_create_database.htm


That's all we know

read more website design
Penelusuran topik khusus di blog ini
Loading